
Waterproofing Under Tiles: What AS 3740 Actually Requires
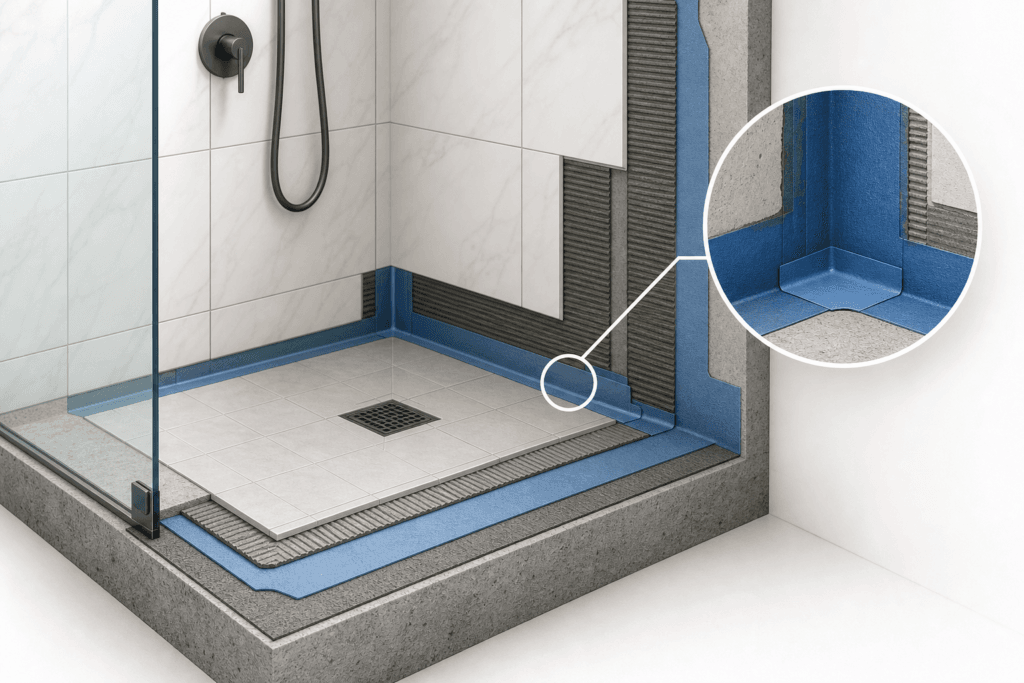
Waterproofing under tiles in Australian bathrooms is governed by AS 3740:2021 Waterproofing of Domestic Wet Areas, and the requirements are more specific than most installers acknowledge. The standard mandates a minimum height of 1800 mm on shower walls, a 40 mm extension on both sides of every wall junction, a bond breaker or fillet at all internal corners sized to the membrane class, and a floor substrate fall of at least 1:100 toward the waste. Getting those details right is what separates a compliant installation from one that fails behind the tiles, often years before the damage becomes visible.
What AS 3740:2021 Actually Covers
AS 3740:2021 sets out the minimum requirements for waterproofing in domestic wet areas, including bathrooms, ensuites, laundries, and shower recesses. It specifies materials, application methods, substrate preparation, junction detailing, and membrane extent. The standard applies to new construction and to rectification work in existing dwellings.
The NCC (formerly the Building Code of Australia) references wet area waterproofing requirements under its health and amenity provisions. The technical standard defines how those requirements are satisfied in practice.
One distinction the standard draws is between enclosed and unenclosed shower types. The classification affects the required extent of waterproofing beyond the immediate shower zone, because the two types differ in how water is contained during use.
The standard also classifies membranes into three classes. Class II and Class III membranes are fluid-applied, and they differ in their minimum film thickness and their bond breaker requirements at internal corners. Those differences have direct consequences for how the installation is detailed, which is covered in the step-by-step process below.
Non-compliance is not always obvious at the time of tiling. A membrane applied at the wrong height, or without the correct junction detailing, will not show any visible defect until water has already migrated into the substrate and adjacent structure.
How to Waterproof Under Tiles: The AS 3740 Step-by-Step Process
Waterproofing a bathroom before tiling requires five steps performed in a specific sequence. Skipping or reordering any of them creates a non-compliant installation, regardless of how good the membrane product is.
Identify the shower classification. Before any materials are ordered or applied, determine whether the shower is enclosed or unenclosed. This classification sets the required extent of waterproofing across the floor and up the walls. An enclosed shower has a contained water zone; an unenclosed shower does not, and the waterproofing must compensate for that absence.
Prepare the floor substrate to a minimum fall of 1:100 toward the waste. The floor substrate must be graded at a minimum of 1:100 where a floor waste is present. A flat substrate that relies on the finished floor to create drainage will not meet the standard. The intent is to ensure that any water that penetrates the tile layer reaches the waste rather than pooling under the membrane.
Apply a bond breaker at all wall-to-floor and wall-to-wall junctions. Internal corners are the most vulnerable points in any waterproofing assembly. When a membrane is applied directly into a sharp 90-degree corner, it bridges the angle under tension and is prone to cracking as the structure moves. A bond breaker, typically a foam rod or compressible strip, or a coved fillet, eliminates that tension point. The required size depends on the membrane class. A 12 mm bond breaker or fillet is required for Class III membranes, and a 35 mm bond breaker is required for Class II membranes. Applying the wrong size for the membrane class is a compliance failure, even if the membrane itself is correctly applied everywhere else.
Apply the waterproofing membrane to a minimum height of 1800 mm on shower walls. The NCC requires shower area walls to be waterproofed to a minimum height of 1800 mm above the floor substrate. The membrane must be continuous from the floor junction up to that height, with no gaps, pinholes, or areas of insufficient film thickness. For fluid-applied membranes, this typically means two or more coats applied in accordance with the manufacturer's specification to achieve the required dry film thickness for the membrane class.
Extend the membrane at least 40 mm on either side of every wall junction within the shower. National regulations require that wall junctions in shower areas be waterproofed at least 40 mm on both sides of the joint. This applies at every internal corner where two walls meet, and at every wall-to-floor junction. In practice, the membrane must lap well beyond the corner detail on both surfaces.
These five steps apply to every shower installation, whether it is a new build or a rectification of defective work. The sequence is not arbitrary. The substrate fall must be correct before the bond breaker is placed, and the bond breaker must be in position before the membrane is applied. Reversing or combining steps produces a result that looks complete but is structurally non-compliant.
Waterproofing Complex Geometries: Niches, Soap Holders and Internal Corners
Niches and recessed soap holders are among the most frequently defective details in shower waterproofing. They are also the areas most often omitted from generic compliance guides. The standard does not exempt these features from its requirements; the same membrane extent and junction detailing rules apply inside a niche as they do on the main shower walls.
Follow these steps when waterproofing a niche or recessed fitting:
Confirm the niche substrate is structurally sound and free of movement. A niche cut into a stud wall or blockwork must be fully supported before any membrane is applied. Any flex or movement in the niche substrate will crack the membrane regardless of product quality.
Apply a bond breaker at every internal corner inside the niche. Every internal corner inside the recess requires a bond breaker sized to the membrane class in use. For Class III membranes, that means a 12 mm bond breaker or fillet at each corner; for Class II membranes, 35 mm is required. These are small spaces, and it is common for installers to skip the bond breaker on the assumption that the tight geometry will hold the membrane in place. It does not.
Apply the membrane continuously from the main shower wall surface into and across the full niche interior. The membrane must not start at the edge of the niche opening. It must continue from the waterproofed wall surface into the recess without interruption, covering all five internal faces of the niche. Any break at the niche perimeter creates a pathway for water ingress directly behind the tiled surface.
Extend the membrane at least 40 mm on both sides of each internal junction within the niche. The junction extent requirement applies inside the niche exactly as it does on the main walls. Each of the five internal corners must have 40 mm of membrane coverage on both adjoining surfaces, measured from the centre of the joint.
Allow the membrane to cure fully before tiling the niche. Tiling over an uncured membrane in a confined recess is a common cause of adhesion failure. The niche is typically the last area tiled, which means it is also the area most likely to be rushed at the end of a job.
The same logic applies to recessed soap holders and built-in shelving. If it has internal corners and it sits within the shower zone, it requires the same detailing as the niche. There is no simplified version of this requirement for smaller features.
Do You Have to Waterproof the Whole Bathroom Floor Under Tiles?
Not the entire bathroom floor, but more of it than many installers apply. The floor within the shower zone must be fully waterproofed, and the walls must reach the required height above the floor substrate. Outside the shower zone, the requirements are less prescriptive, but the standard does not permit the rest of the bathroom floor to be left entirely unprotected.
The standard distinguishes between the shower area and the broader wet area. Within the shower zone, the floor must be fully waterproofed and the walls covered to the required height. Outside that zone, the standard still requires waterproofing at wall-to-floor junctions and at penetrations, even where full floor coverage is not mandated.
In practice, extending the membrane across the full bathroom floor is the more reliable approach. Partial coverage creates defined boundaries between waterproofed and unprotected substrate, and those boundaries are exactly where water tends to track when it finds a path through the tile layer. A transparent waterproof coating applied over tiles is not a substitute for a sub-tile membrane at this stage; it addresses surface moisture only and does not protect the substrate or the junctions beneath.
Tile waterproofing sealers applied to grout lines and tile surfaces reduce surface absorption and slow moisture penetration, but they are maintenance products, not primary waterproofing. The compliant membrane must be in place before tiling begins.
For a detailed breakdown of how bathroom waterproofing requirements interact with waterstop and threshold detailing, the Awesim guide to bathroom waterstops and wet area waterproofing covers those connections in full.
Waterproofing Over Tiles on a Balcony: Is It the Same Standard?
Balcony waterproofing is governed by different provisions. The wet areas standard applies specifically to internal spaces such as bathrooms, ensuites, laundries, and shower recesses. A balcony is an external element, and its waterproofing requirements sit under separate NCC provisions that address exposure conditions and structural movement not relevant to internal wet areas.
That distinction matters when someone asks about waterproofing over tiles on a balcony. Applying a liquid membrane or transparent coating over existing tiles on a balcony is a different technical exercise from waterproofing a bathroom floor before tiling. The substrate on a balcony is typically a concrete slab or structural deck, and the waterproofing system must accommodate movement, thermal cycling, and exposure to weather in ways that an internal bathroom membrane does not.
Where a balcony has existing tiles that are sound and well-bonded, an over-tile liquid membrane system may be appropriate, but the selection and application must account for the specific exposure conditions and the NCC requirements for that element. A transparent coating applied to balcony tiles without addressing the underlying substrate condition or the junction details at the perimeter and drainage points will not produce a compliant or durable result.
For NSW-specific detail on what the NCC requires for balcony waterproofing and where these installations most commonly fail, see the article on balcony waterproofing requirements and common failures in NSW.
What Does Waterproofing Under Tiles Cost in Australia?
Waterproofing costs depend on the size of the area, the membrane class specified, the complexity of substrate preparation, the number of penetrations and junctions to be detailed, and whether the work is a new installation or a rectification. Rectification is consistently more expensive because it typically involves stripping existing tiles and finishes before any membrane work can begin.
When waterproofing fails and the damage reaches the subfloor or adjacent structure, the scope of rectification expands significantly. A 2026 source notes that subfloor reconstruction costs can exceed $10,000 in cases of serious waterproofing failure. That figure is not a typical project cost; it reflects the outcome when a failure goes undetected long enough to cause structural damage.
What Are the Most Common Waterproofing Mistakes Under Tiles?
Most waterproofing failures are not the result of using the wrong product. They result from correct products applied incorrectly, or correct details omitted under time pressure. Research supports this: a 2025 functional test by RISE Research Institutes of Sweden found that only 25 % of tested waterproofing systems remained leak-free, and a 2020 RISE study found microbial growth in 48 % of bathroom tile specimens exposed to water.
The most frequent compliance failures are:
- Insufficient membrane height on shower walls: The membrane stops below the required height, leaving the upper wall unprotected where water from a shower rose or handheld spray regularly reaches.
- Missing or undersized bond breakers at internal corners: The bond breaker is omitted entirely, or a Class III-sized detail is used where a Class II membrane requires a 35 mm bond breaker, causing the membrane to crack at the corner as the structure moves.
- Inadequate fall in the floor substrate: The substrate is laid flat, and drainage relies on the tile bed. Water pools beneath the membrane rather than reaching the waste.
- Incomplete membrane coverage at niches and penetrations: The membrane stops at the niche perimeter rather than continuing into the recess. Every internal corner inside the niche becomes an unprotected junction.
- Tiling over an uncured membrane: The membrane has not reached its required dry film thickness or cure time before tiles are bedded, causing adhesion failure and membrane damage.
Each of these failures is concealed once tiling is complete. By the time moisture appears at a skirting board or an adjoining room's floor, the damage to the substrate is already significant.
When Should You Get a Professional Waterproofing Inspection?
Some waterproofing problems are obvious: a wet ceiling below a bathroom, efflorescence on a wall, or tiles that have debonded and are hollow underfoot. Others are not. A membrane that was applied at the wrong height, or without bond breakers at internal corners, will look identical to a compliant installation from the surface. The defect only becomes apparent when water has already tracked into the structure.
A professional forensic waterproofing inspection is appropriate in several situations. If you are buying a property and the bathrooms or wet areas are more than a few years old, an inspection before settlement can identify concealed defects before they become your liability. If you are in a dispute with a builder or contractor over bathroom or shower leaks, an independent inspection produces the documented evidence needed for NCAT or court proceedings. If rectification work has already been carried out and leaks have recurred, an inspection can determine whether the rectification was compliant or whether the underlying defect was never properly addressed.
According to RISE Research Institutes of Sweden's 2025 testing, only 25 % of waterproofing systems tested remained leak-free. That figure suggests that a significant proportion of installed systems will eventually fail, and many already have. Waiting for visible damage before acting typically means the scope of rectification, and its cost, has already grown.
Awesim Building Consultants is a building consultancy that prepares forensic waterproofing inspection reports and independent Expert Witness Reports for use in NCAT, NSW District Court, and Supreme Court proceedings, operating across NSW since 1996. For matters involving suspected waterproofing defects, an independent inspection is the appropriate first step. For related guidance on waterproofing defects and what a forensic inspection covers, the NSW waterproofing defects expert guide is a useful reference.
FAQs
How can I waterproof my bathroom floor under tiles myself?
DIY waterproofing is possible for straightforward bathroom floors using a fluid-applied membrane product. The process follows the same sequence as any compliant installation: prepare the substrate to the correct fall, apply bond breakers at all internal corners sized to the membrane class, apply the membrane to the required coverage and film thickness, and allow full cure before tiling. The most common DIY failures are insufficient coverage at junctions and corners, and tiling before the membrane has fully cured. If the bathroom is in a multi-storey building or the work is part of a dispute, a licensed waterproofer and independent inspection are the safer approach.
Is there waterproofing under roof tiles, and does AS 3740 apply?
The wet areas standard is scoped to domestic wet areas, meaning internal spaces such as bathrooms, ensuites, laundries, and shower recesses. Roof tile systems involve separate building envelope provisions under the NCC and are outside that scope. Roof waterproofing and sarking requirements sit under different standards and NCC deemed-to-satisfy provisions. If you are dealing with a leak that originates at a roof rather than a bathroom or shower, the applicable standards and inspection approach are different.
What is the difference between a Class II and Class III waterproofing membrane under AS 3740?
Both Class II and Class III membranes under AS 3740:2021 are fluid-applied systems, but they differ in minimum dry film thickness and in the bond breaker size required at internal corners. Class III membranes require a 12 mm bond breaker or fillet at internal corners, while Class II membranes require a 35 mm bond breaker, reflecting a greater need to relieve stress at junctions. The class specified for a project determines both the product selection and the detailing requirements. Using a bond breaker sized for Class III when a Class II membrane is in use is a compliance failure regardless of how well the membrane itself is applied.
How long should waterproofing cure before tiling?
Cure times vary between products and are set by the membrane manufacturer. Always follow the manufacturer's technical data sheet for the specific product in use, and do not rely on visual appearance alone to judge cure. In humid conditions or confined spaces such as niches, cure times can extend beyond the typical range stated on the product label.
Can you apply a tile waterproofing sealer over existing tiles instead of removing them?
A tile waterproofing sealer applied to the surface of existing tiles addresses surface absorption and can slow moisture penetration through grout lines. It is a maintenance product, not a primary waterproofing membrane. Where the underlying membrane is absent, damaged, or non-compliant, a surface sealer does not remedy that defect. For a compliant installation, the membrane must be applied to the substrate before tiling. If existing tiles are to remain in place and a liquid system is being applied over them, the suitability of that approach depends on the substrate condition, the tile bond, and the specific exposure conditions involved.
Conclusion
AS 3740:2021 sets out specific, measurable requirements for waterproofing under tiles: 40 mm at every wall junction, bond breakers sized to the membrane class (12 mm for Class III, 35 mm for Class II), and a floor substrate fall of at least 1:100. These are not guidelines. They are the minimum standard, and any installation that falls short of them is non-compliant, regardless of how it looks once the tiles are on.
If you are planning a bathroom or shower project, check that your waterproofer is applying the correct bond breaker for the membrane class they are using, and confirm that the membrane height and junction extent will be inspected before tiling begins. If you already have a bathroom that is leaking or showing signs of moisture damage, the right first step is an independent inspection that can document what was installed, how it compares to AS 3740:2021, and what rectification is required.

Related Posts
Waterproofing Under Tiles: What AS 3740 Actually Requires
Waterproofing under tiles in Australian bathrooms is governed by AS 3740:2021 Waterproofing of Domestic Wet Areas, and the requirements are
Read More »
Waterproofing Inspector: How to Choose One for a NSW Claim
Why a Standard Building Inspector Is Not Enough What a Forensic Waterproofing Inspection Actually Covers Membrane and System Identification AS
Read More »
Building Inspection Report Template and What Courts Expect
What a Building Inspection Report Template Looks Like in Practice The Schedule 7 Requirement and Why It Changes Everything How
Read More »