
Cornice Cracking: How to Tell If the Damage Is Serious
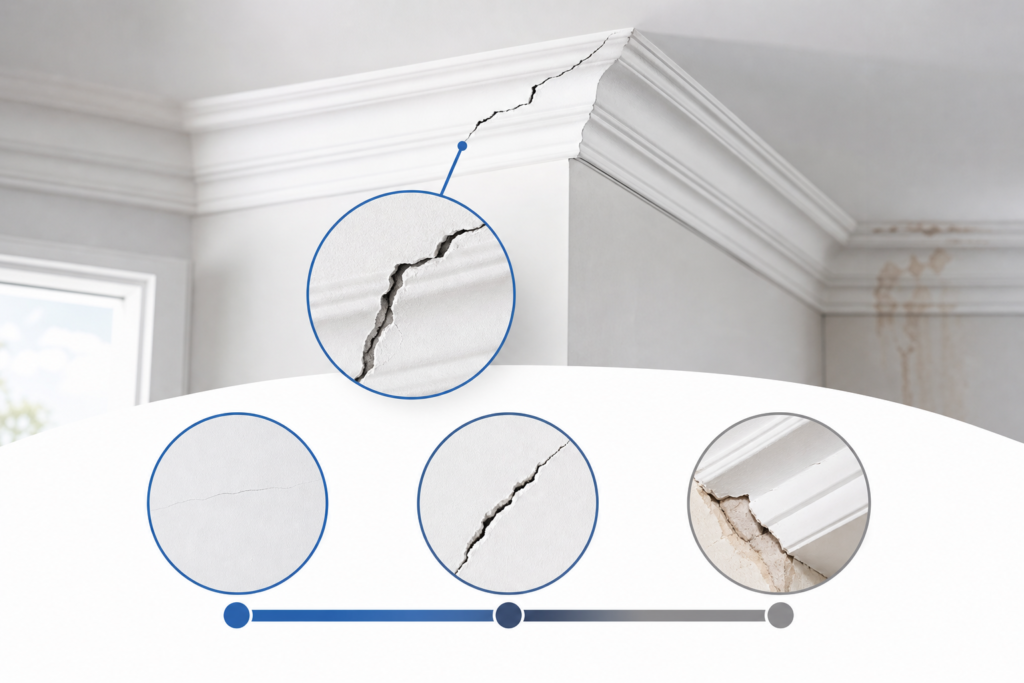
Cornice cracking is one of the most common concerns Australian homeowners raise, and the hard part is not spotting the crack but knowing which side of the line you're on. Hairline cracks under 3mm are usually cosmetic. This guide walks you through a practical self-assessment sequence: measure the crack, read its shape, monitor it for change, and understand exactly when a professional needs to get involved. Cracking is serious when a crack exceeds 5mm in width, runs in a straight line suggesting structural separation, or is accompanied by sagging plasterboard, water staining, or visible movement.
Cornice cracks are extremely common in Australian homes. Most are harmless. A small number are not. The gap between a cosmetic blemish and a structural warning sign is a specific, measurable threshold, and this article gives you what you need to find it.
What Causes Cornice Cracking?
Several distinct forces can open a crack at the wall-ceiling junction. Identifying the cause matters because it shapes how you read the severity.
Seasonal movement and temperature fluctuation are the most frequent culprits. Timber framing and plasterboard expand and contract across the seasons, and the cornice, fixed between two surfaces moving at slightly different rates, absorbs that stress. Repeated cycling opens fine cracks along the joint line. These are typically cosmetic.
Moisture intrusion is a more serious cause. Water from a roof leak, a failed waterproofing membrane, or a plumbing fault saturates the plasterboard above the cornice, weakening the adhesive bond as it swells and dries. Cracks from moisture are often accompanied by staining, soft spots in the ceiling, or paint bubbling near the cornice line.
Reactive clay soils underlie much of the Sydney basin and other parts of NSW. These soils shrink in dry conditions and swell when wet, moving the slab or footings and expressing that movement at the weakest internal points: joints, cornices, and wall-ceiling junctions. Cracking from soil movement tends to appear in diagonal or stepped patterns across multiple rooms.
Structural loading changes and poor original installation round out the common causes. Removing a wall or altering the roof redistributes loads through the frame, and the lining follows any deflection. Cornice adhesive applied too thinly or to a dusty substrate loses its grip over time, producing cracks that often run uniformly along the full length of a junction.
How to Measure a Cornice Crack and What the Width Tells You
Width is the single most useful measurement when assessing a cornice crack. It gives you an objective starting point before anything else.
To measure accurately, use a steel ruler or a set of feeler gauges rather than estimating by eye. Place the edge of the ruler across the widest point of the crack and read the measurement in millimetres. If the crack tapers, measure at its widest point. Take measurements at several points along its length, because a crack that is 1mm wide at one end and 6mm wide at the other tells a very different story from one that is uniformly narrow.
Two benchmarks are widely used in crack assessment by Australian building practitioners. A crack measuring 3mm or less is typically cosmetic and does not affect a building's structural stability. These cracks are common in settled homes and are generally safe to monitor and repair yourself. At the other end of the scale, any crack larger than 5mm warrants a thorough structural survey to confirm safety, a threshold that aligns with Babergh Council's 2025 guidance and reflects the thresholds professionals apply in practice. These figures are not a specific Australian Building Code requirement, but they are the working reference points used across the industry.
The range between 3mm and 5mm is where judgement is required.
A crack in this band is not automatically serious, but it warrants closer attention. A 4mm crack that has been stable for five years is a different matter from a 4mm crack that was 2mm wide six weeks ago. A narrow crack accompanied by water staining or plasterboard deflection is more concerning than a wider crack that is dry, stable, and uniform. Width gives you a starting point; the visual signs in the next section help you complete the picture.
For homeowners in newer builds, it is also worth reading about hairline cracks in new homes and when to worry, since settlement patterns in the first few years after construction follow their own logic.
Visual Warning Signs That Cornice Cracking Is Serious
Crack width gives you a number. The visual character of the crack tells you what is behind it. Together, these two pieces of information allow you to make a sound preliminary assessment.
The following signs indicate that a cornice crack deserves professional attention rather than a DIY repair:
A straight, continuous separation along the full cornice length. A crack that runs cleanly and consistently from one end of the wall to the other often indicates that the cornice has separated from the substrate rather than simply cracked within itself. This pattern suggests adhesion failure or structural movement, not routine settlement.
Sagging or bowing plasterboard at the ceiling. If the ceiling surface adjacent to the cornice appears to deflect downward, even slightly, the plasterboard may have lost its fixing to the framing above. This is a safety concern, not just a cosmetic one.
Water staining at or near the cornice line. Brown or yellow discolouration along the cornice, or on the ceiling immediately above it, points to moisture intrusion. The crack may be a secondary symptom of a leak that has been active for some time. Repairing the crack without addressing the moisture source will not solve the problem.
Cracks that widen progressively. A crack that was hairline six months ago and is now 3mm or more has been growing. Active cracks indicate an ongoing cause, whether that is soil movement, structural deflection, or a persistent moisture source.
Diagonal cracking at corners. Cracks that run diagonally from the corner of a door or window frame up toward the cornice are a classic indicator of differential settlement or structural movement. They rarely appear in isolation.
Multiple cracks appearing simultaneously in different rooms. When cornice cracking appears across several rooms at once, particularly if the cracks share a similar orientation, a building-wide cause is more likely than localised settlement.
Paint bubbling or flaking along the cornice. This often accompanies moisture-related cracking and suggests the problem has been present long enough for the surface finish to degrade.
Uniform hairline cracks that follow the joint line, are consistent in width, and appear in a single room without any of the above signs are almost always cosmetic. They are the normal result of seasonal movement in a settled building. It is also worth noting the distinction between a crack that is at the cornice joint and one that runs through the plasterboard or masonry adjacent to it. The latter is a more serious finding.
For a broader overview of what structural defects look like in residential buildings, the guide on signs of structural defects in new homes covers the wider pattern of symptoms worth checking alongside cornice cracking.
How to Check Whether a Cornice Crack Is Growing
A stable crack and an active crack can look identical on the day you first notice them. The only way to tell them apart is to monitor the crack over time and record what you find.
You do not need specialist equipment for this. The method is straightforward and takes less than five minutes to set up.
- Clean a short section of the crack with a dry cloth to remove dust and loose paint.
- Cut a small strip of masking tape and apply it across the crack at its widest point, pressing it firmly to both sides. Write today's date on the tape with a permanent marker.
- Photograph the crack from a consistent distance and angle. Include a ruler or coin in the frame for scale.
- Mark the ends of the crack on the wall with a pencil, noting the date beside each mark. This lets you track whether the crack is extending lengthways as well as widening.
- Check the tape and the pencil marks after two weeks, then again after four weeks. If the tape has torn, the crack has moved. If the pencil marks no longer align with the crack ends, the crack has extended.
- Re-photograph at each check using the same framing as your first shot.
Review your results after 90 days. A crack that has not torn the tape, not extended past your pencil marks, and not changed in character across that period is almost certainly stable. Any movement, even slight, means the crack is active. Cracks that grow consistently in one direction, or that widen without reversing, suggest something persistent: soil movement, structural deflection, or an undetected moisture source. Those causes do not resolve themselves, and a cosmetic repair applied over an active crack will fail.
How to Fix Cornice Cracking: A Step-by-Step Repair Guide
Before you start any repair, confirm that the crack is cosmetic or minor. The steps below are suitable for internal plaster cornices where the crack is stable, under 3mm wide, and not accompanied by any of the warning signs described earlier. Do not attempt this repair on a crack that is active, exceeds 5mm, or sits alongside sagging plasterboard or water staining.
The materials you need are modest. A flexible cornice filler is the right product for this job. Unlike rigid wall fillers, a flexible filler accommodates minor seasonal movement in the building frame, which means it is less likely to crack again after the repair. Per workshop.bunnings.com.au and gaudicoving.ie, it must be smoothed before it dries, because painter's tape will pull the sealant out of the joint if applied after it has set. The overall cost of materials for a standard room is relatively low.
Follow these steps in order:
Open the crack and remove loose material. Use a scraper to open the crack slightly and remove any flaking paint or loose debris. This ensures the filler bonds to sound material rather than sitting on top of a fragile surface.
Insert wedges to hold the gap open. Place plastic wedges along the crack at 300mm intervals. This keeps the joint open and accessible while you clean it and apply adhesive.
Inject adhesive behind the cornice. Insert a multi-purpose flexible sealant or adhesive behind the cornice to secure it to the wall. Work along the full length of the loose section, not just the visible crack. If the cornice flexes when you press it gently, adhesion has failed and this step is essential.
Pre-drill for mechanical fixing. Pre-drill countersunk holes every 15cm along the loose edge. This prepares the cornice for screws without splitting the plaster.
Secure with screws. Insert 50mm bugle head screws into the pre-drilled holes to re-secure the cornice to the wall studs. Drive them flush with the surface so they do not protrude above the fill line.
Fill the crack and screw holes. Apply flexible filler to the crack surface and over each screw hole, smoothing it with a wet finger. Work quickly and keep a damp cloth nearby. Once the filler begins to set, do not disturb it.
Sand and paint. Once the filler is fully dry, lightly sand the repaired area and paint the cornice to blend with the original finish. Two thin coats typically produce a cleaner result than one heavy coat.
A repair carried out this way should remain stable for several years in a settled building. If the same crack reopens within twelve months, the underlying cause has not been resolved and a professional assessment is warranted.
When to Call a Building Professional Instead of DIY
Some cornice cracks are beyond the scope of a DIY repair. Attempting one can mask a problem that needs proper investigation.
Call a professional if any of the following apply. The crack exceeds 5mm at its widest point: at that width, a cosmetic repair is not appropriate and a structural survey is needed before any work begins. The crack is active and has grown or extended over your monitoring period. The cornice is sagging, or the adjacent plasterboard deflects when pressed. Water staining is present, because the moisture source must be identified and rectified before any surface repair is attempted. Cracking has appeared across multiple rooms simultaneously, which points to a building-wide cause.
In these situations, a cosmetic repair is not the right first step. The priority is understanding what is driving the damage.
For NSW homeowners involved in a building dispute, or where the damage forms part of a broader defect claim, a formal inspection and written report may be necessary. Awesim Building Consultants is an Australian building consultancy operating across NSW since 1996, preparing independent Expert Witness Reports, Scott Schedules, and Forensic Waterproofing Inspection reports for use in NCAT, NSW District Court, and Supreme Court proceedings. If cornice cracking is part of a wider pattern of building defects, the firm's building defect report service covers the inspection and documentation process for formal dispute matters in NSW.
Cornice Cracking in Different Materials: Plaster, Polystyrene, and Masonry
Most guides to cornice cracking assume the cornice is traditional plaster. In practice, the material affects both how cracks appear and how you should respond.
Internal plaster cornices are the most common type in Australian homes and the focus of the repair steps above. They crack predictably along adhesive joints and respond well to flexible filler when the cause is cosmetic.
Polystyrene cornices are lightweight, factory-profiled sections used in many homes built from the 1990s onward. They are more flexible than plaster, so they tend to separate at the joint rather than crack through the body of the cornice. Gaps at the wall or ceiling line are the typical sign. Because the material flexes rather than fractures, the repair approach is different: use a paintable acrylic sealant rather than a rigid filler, and press the cornice back firmly against the substrate before the sealant skins over. The steps in this guide are written for plaster and do not apply directly to polystyrene.
External masonry cornices, found on older brick or rendered buildings, crack differently again. Damage here can indicate render failure, moisture behind the render coat, or movement in the masonry substrate. Because a falling section of external masonry poses a greater safety risk than internal plaster, arrange a professional assessment as soon as you notice cracking rather than waiting to monitor it.
FAQs
Can cornice cracking indicate foundation problems?
Yes, it can. Cracking that appears in diagonal lines running from corners toward the cornice, or that affects multiple rooms at once, is one of the patterns associated with differential settlement or reactive soil movement beneath the slab. A cornice crack on its own is rarely conclusive evidence of a foundation problem, but when it appears alongside sticking doors, sloping floors, or cracking in external brickwork, the combination warrants a professional structural assessment rather than a cosmetic repair.
Is it safe to live in a house with cracked cornices?
In most cases, yes. The majority of cornice cracks are cosmetic and pose no safety risk. The exception is a cornice or ceiling section that is actively sagging or has lost its mechanical fixing to the framing above. Loose plasterboard overhead is a physical hazard. If you notice any deflection or movement in the ceiling adjacent to the crack, avoid the area and arrange an inspection promptly. A crack that is stable, dry, and under 3mm wide does not require you to vacate the property.
How long does a cornice repair last before cracking again?
A well-executed repair using flexible filler on a stable crack should hold for several years in a settled building. The main reason repairs fail early is that the underlying cause has not been addressed. If the building is still moving, if a moisture source remains active, or if the original adhesion failure was not corrected before filling, the crack will reopen. Using a rigid filler instead of a flexible one also shortens the repair life, because rigid products cannot accommodate minor seasonal movement in the frame.
Does home insurance cover cornice cracking?
Generally, no, not for cosmetic cracking caused by settlement or seasonal movement. Most home insurance policies exclude gradual deterioration and movement-related cracking. Coverage may apply where cracking results from a sudden, defined event such as storm damage or an impact, but the insurer will assess the cause carefully. If you are making a claim, a written inspection report that documents the cause and extent of the damage will support your position. For guidance on the assessment process, the NSW building insurance claims assessment guide covers what insurers typically look for and how reports are used.
What is the difference between a cornice crack and a ceiling crack?
A cornice crack occurs at the junction between the wall and the ceiling, where the cornice moulding meets one or both surfaces. A ceiling crack runs across the flat plane of the ceiling itself, away from the wall. Both can have cosmetic or structural causes, but ceiling cracks that run across the centre of a room, particularly those that are wide or accompanied by sagging, are more directly associated with framing deflection or fixing failure. Cornice cracks are more often caused by adhesion failure or differential movement at the joint. The assessment approach is similar, but the location changes which structural elements you consider first.
Conclusion
Cornice cracking is common, and most of it is cosmetic. The practical dividing line sits at crack width: under 3mm with no accompanying symptoms is a maintenance issue. Over 5mm, or any width combined with sagging, water staining, or active growth, is a reason to stop and get a professional opinion before touching it.
The most useful thing you can do right now is measure the crack, check it against the visual warning signs in this guide, and set up a simple monitoring record if you are unsure. If the crack is stable and minor, the repair steps above will handle it. If it is active, widening, or part of a broader pattern of defects across the building, that is the point to seek a formal inspection rather than reach for the filler.

Related Posts
Cornice Cracking: How to Tell If the Damage Is Serious
Cornice cracking is one of the most common concerns Australian homeowners raise, and the hard part is not spotting the
Read More »
Digital Construction Consultant Australia: What They Do
A digital construction consultant in Australia manages the technology-driven side of building projects: BIM coordination, clash detection, asset data handover,
Read More »
Strata Report: What Buyers Need to Read Before Signing
A strata report is the document that surfaces hidden obligations before you are legally committed to a purchase. A strata
Read More »