
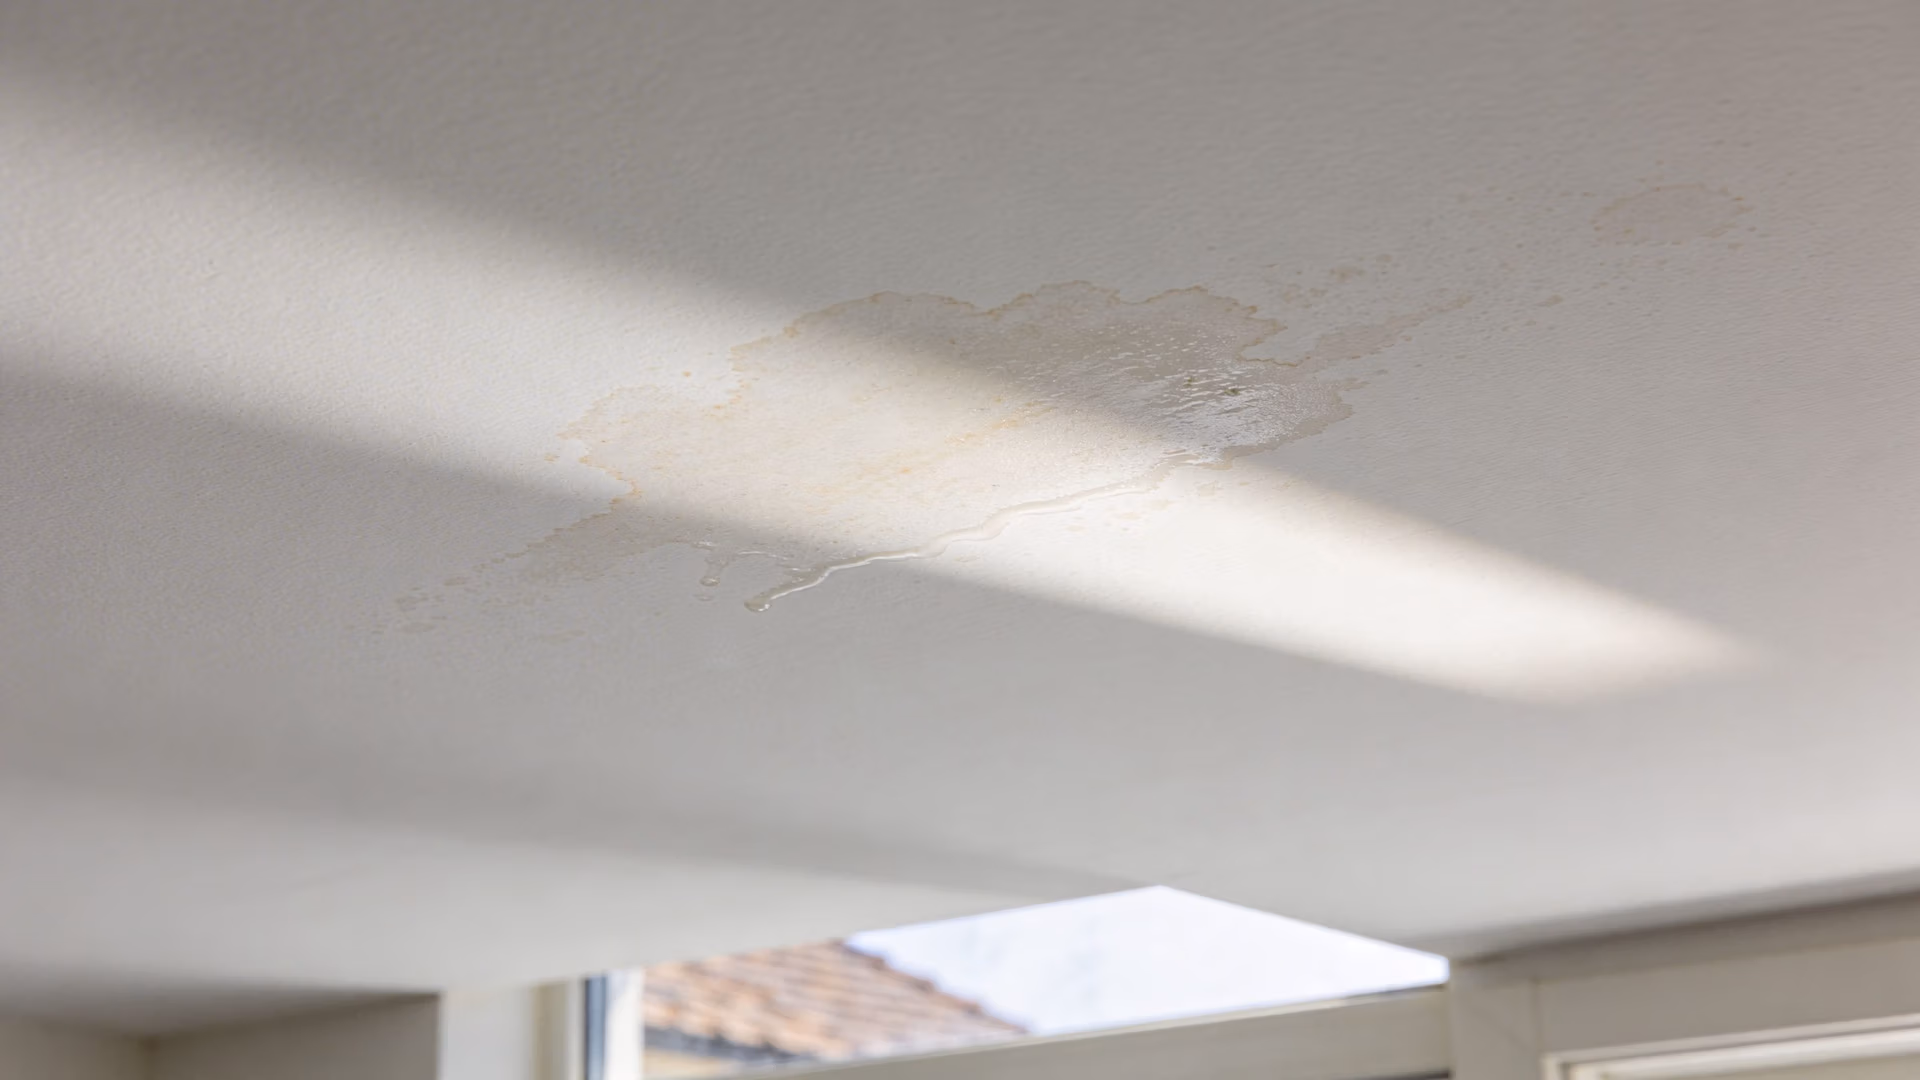
You notice a brown mark on the ceiling near an external wall. You repaint it. The next storm comes through, and the stain returns. A few weeks later the cornice starts to swell, the paint bubbles near a window, and someone tells you it’s “probably just a roof issue”.
Often, it isn’t just the roof. It’s the junction. It’s the detail where one material stops and another begins. In a building dispute about flashings, that small hidden detail is usually where the argument starts.
For homeowners, that’s frustrating because the damage shows up inside while the defect sits buried behind tiles, cladding, brickwork or window frames. For builders, it’s frustrating because not every leak is caused by one trade or one simple mistake. For solicitors, flashing disputes are difficult because the technical cause, the scope of damage, and the allocation of responsibility all have to be proved properly.
In New South Wales, that proof matters. If the evidence is weak, the dispute drifts. If the evidence is clear, the path through Fair Trading and NCAT becomes far more manageable.
The Unseen Defect Behind Costly Water Damage
A flashing defect rarely announces itself neatly. It starts with a stain, a damp smell, lifting skirting, or moisture around a window that “only happens in heavy rain”. Many people assume the visible symptom is the problem. It usually isn’t. It’s the clue.
A typical pattern looks like this. Water enters at a roof to wall junction, around a window head, or behind masonry where the flashing is missing, reverse lapped, too short, poorly sealed, or incompatible with adjoining materials. The water then tracks sideways or downward through cavities and framing before it appears inside the home. By the time the owner sees it, the visible damage is often well away from the actual entry point.
That’s why flashings cause so many arguments. They are small components with a large job. When they fail, the damage can spread into plasterboard, insulation, framing, flooring and finishes long before anyone identifies the source.
The scale of the issue is not minor. In Australian construction disputes, non-compliant flashing appears in 68% of cases, making it one of the most prevalent defects, and these disputes often end up in NCAT, where cases rose by over 20% from 2020-2022, with homeowners facing $50,000-$200,000 in repairs per strata dispute according to this construction defect litigation analysis.
What the early signs usually mean
Some warning signs are obvious. Others are easy to dismiss.
- Ceiling staining near an external wall usually points to water entry at a junction above, not just a random leak.
- Bubbling paint around windows often suggests moisture is getting behind the frame or cladding interface.
- Damp carpet or swelling skirting can indicate water tracking down inside a wall cavity.
- Rust marks on external masonry or cladding may signal corrosion around metal flashings or fixings.
- Leaks that appear only during wind-driven rain often suggest a detailing failure rather than a simple overflow problem.
If you’re still in the early stage of trying to work out whether the issue is plumbing, roofing, or general water ingress, this guide on how to detect a water leak is a useful starting point before the dispute turns formal.
Water marks tell you where the building surrendered. They almost never tell you where the defect began.
Why these disputes become expensive
A flashing dispute gets costly for two reasons. First, the defect is often concealed. Second, rectification usually involves opening up finished work to inspect what sits behind it.
That means the dispute is rarely about a single wet patch. It becomes a dispute about causation, compliance, rectification scope, access, and who pays for reinstatement after the area is opened.
People lose time here. Owners keep patching symptoms. Builders rely on assumptions. Lawyers receive incomplete instructions. The better approach is to treat the first reliable signs of water ingress as a building envelope issue until proven otherwise.
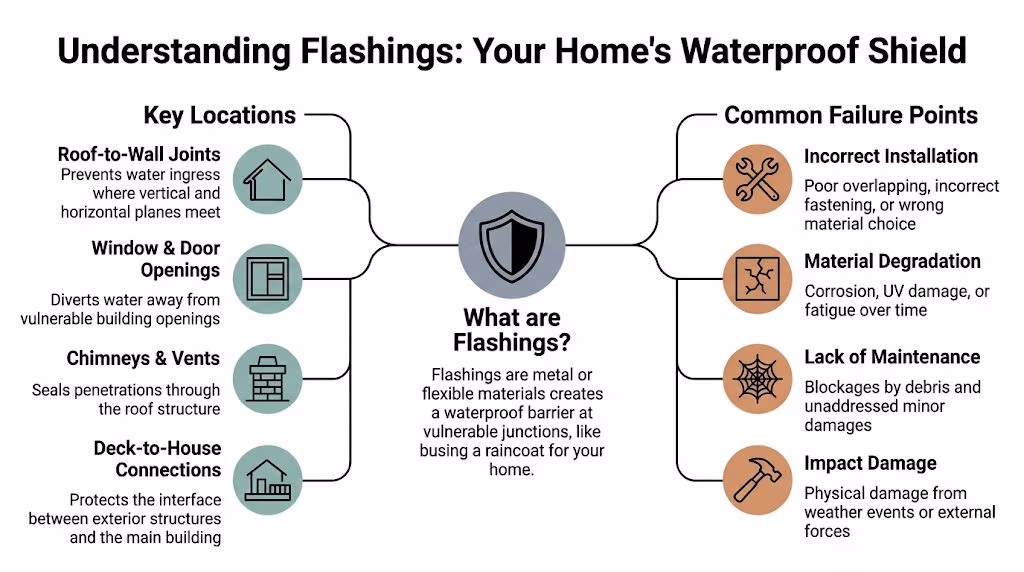
Understanding Flashings and Common Failure Points
Flashings are the building’s waterproof shield at vulnerable junctions. They are the formed metal or flexible waterproofing components that stop water entering where roofs, walls, windows, doors, decks, penetrations and masonry elements meet.
They don’t work by looking impressive. They work by directing water back out of the building before it can get behind the exterior skin.
A plain-English explanation of the basics is this article on What Is Roof Flashing and Why Is It So Important?. For dispute purposes, though, the practical issue isn’t just what flashing is. It’s whether it was selected, installed and integrated correctly with the surrounding system.
Where flashing failures commonly show up
Some locations fail more often than others because they deal with concentrated water flow.
| Location | What the flashing should do | What often goes wrong |
|---|---|---|
| Roof to wall junctions | Turn water away from the wall and back onto the roof surface | Missing step flashing, poor overlap, reverse laps |
| Window and door openings | Collect and drain water away from the opening | No sill drainage path, head flashing omitted, side interfaces left exposed |
| Masonry cavity walls | Redirect moisture back to the exterior through the wall system | Through-wall flashing absent, poor height, blocked weep paths |
| Penetrations such as vents and pipes | Seal around interrupted roof or wall surfaces | Incomplete dressing, poor seal continuity, incompatible materials |
| Deck to wall connections | Stop water entering at a high-risk horizontal junction | Flashing terminated poorly behind cladding or not integrated at all |
What usually causes failure
Workmanship is the recurring issue. According to this survey summary on construction defects, poor workmanship accounts for 81% of construction deficiencies, with flashings implicated in 54% of roof defect claims and 48.2% of waterproofing failures.
Those numbers line up with what practitioners see in real disputes. The defect is often not a mysterious product failure. It is usually one of the following:
- Wrong sequencing: The flashing may have been installed after adjacent materials made proper overlap impossible.
- Poor laps: Water always tests the weakest overlap. If the lap is reversed or too short, the defect is built in from day one.
- Material incompatibility: Certain metals and fixings don’t coexist well in exposed or coastal conditions.
- Blocked drainage paths: A correctly placed flashing can still fail if debris, mortar droppings, sealant or cladding cuts off the drainage route.
- Overreliance on sealant: Sealant can assist a detail, but it should not substitute for proper mechanical water shedding.
Practical rule: If a detail depends on sealant alone to stay watertight, it usually won’t stay watertight for long.
Signs you can look for yourself
You don’t need to diagnose the legal cause on day one. You do need to notice the physical clues.
Look for:
- Visible gaps at roof to wall intersections or around penetrations
- Rust staining on cladding, brickwork or beneath metal trims
- Efflorescence on masonry, which can indicate persistent moisture movement
- Paint failure around window heads and reveals
- Loose or lifted trims after storms or thermal movement
- Internal moisture patterns that correlate with rain direction rather than plumbing use
Some defects are obvious from ground level. Many aren’t. That’s why a building dispute about flashings often turns on hidden conditions behind the finished surface, not the symptom that first brought everyone to the site.
Your Legal Rights The NSW Standards for Flashings
A flashing failure is rarely just a maintenance annoyance. In many matters, it’s a compliance issue. The legal question becomes whether the work met the contract, the National Construction Code, the relevant Australian Standards, and the statutory warranties that apply under NSW law.
That framework matters because NCAT does not decide cases on suspicion. It decides them on evidence tied to obligations.
The first pillar is technical compliance
When a leak occurs at a roof to wall junction, around a window opening, or in masonry, the dispute usually comes back to whether the flashing detail complied with the applicable standard and whether the components were integrated as a proper water management system.
One key area is roof flashing installation under AS 2050:2018. In NSW dispute work, failures at roof wall junctions come up repeatedly because the detail only works when the flashing, underlay, tiles or cladding and termination points all interact correctly. If one trade leaves a gap in that sequence, the whole detail can be compromised.
That’s not a fringe issue. NCAT case data shows 62% of building defect claims between 2020-2025 involved inadequate flashing, and failures at roof wall junctions can lead to repair costs averaging $25,000-$45,000, as noted in Awesim’s guide to NCAT and building disputes in NSW.
The second pillar is the Home Building Act
For homeowners, the practical protection usually sits in the Home Building Act 1989. If the work was residential building work covered by the Act, statutory warranties may apply. Those warranties broadly relate to matters such as due care and skill, suitability of materials, and compliance with the law.
The legal value of those warranties is simple. They give the owner a defined basis to say the work was not just inconvenient or disappointing. It was defective.
For a builder, that same framework matters for the opposite reason. If the defect complaint is overstated, a builder needs to respond by showing what was built, what was specified, what others changed, and whether the claimed failure reflects the work they were responsible for.
The third pillar is the NSW dispute pathway
Most flashing matters don’t begin in a courtroom setting. They begin with notice to the builder, gathering documents, and often some level of engagement with NSW Fair Trading before progressing to NCAT if the issue remains unresolved.
The process is more procedural than many owners expect. NCAT wants the defect itemised. It wants the evidence attached to each issue. It wants the parties’ competing positions made clear.
That’s especially important in a building dispute about flashings because these cases often involve overlapping responsibilities. The roof tiler may blame the framer. The window installer may point to cladding. The builder may say the design detail was incomplete. The owner may only know that water is entering a finished home.
What works and what doesn’t
The strongest legal position usually comes from linking four things together:
- The observed damage
- The hidden defect
- The breached standard or contractual obligation
- The rectification required
What doesn’t work is broad allegation. Saying “the flashing is wrong” is not enough. The Tribunal needs to know what flashing, where, how it fails, what standard or accepted method it breaches, and what remedial work follows from that finding.
A successful claim isn’t built on the existence of a leak alone. It’s built on a provable path from water entry to breach.
Where parties often get stuck
Homeowners often delay because they hope the leak will prove simple. Builders often respond too quickly with patch repairs before the source is properly isolated. Solicitors sometimes receive photos and correspondence but no technical analysis that ties the defect to a standard.
That gap matters. The legal rights may exist, but rights without building evidence are hard to enforce. In flashing matters, the technical and legal cases have to run together from the start.
How to Build Your Case With Strong Evidence
The difference between a weak claim and a well-supported claim is usually not passion. It’s documentation. In a building dispute about flashings, you need evidence that shows the symptom, identifies the cause, and supports the proposed rectification.
A few phone photos after rain won’t usually get you there on their own.
Start with the records already in your hands
Before any invasive inspection, gather the material that already exists. Organise it by date. Keep everything in one folder. If the matter goes to Fair Trading or NCAT, a clean timeline helps more than people realise.
| Evidence Type | Description | Why It’s Important |
|---|---|---|
| Photos and videos | Dated images of stains, leaks, rust, swelling, cracking, external defects and weather conditions | Shows progression and timing of the problem |
| Building contract and plans | Signed contract, drawings, specifications, variations and scope documents | Identifies who was responsible for the relevant work |
| Emails, texts and letters | Written complaints, builder responses, site meeting notes and promises to return | Establishes notice and the parties’ positions |
| Invoices and receipts | Repair attempts, emergency make-safe work, consultant fees and damage-related spending | Helps quantify loss and separate temporary work from full rectification |
| Maintenance records | Gutter cleaning, roof maintenance, prior inspections and storm-related notes | Addresses common arguments about owner neglect |
| Occupant observations | Short written log of when leaks occur, where they appear and under what weather conditions | Helps correlate the failure with likely entry conditions |
Then move to hidden defect evidence
Flashing defects often sit behind brick veneer, wall wraps, cladding, tiled edges, window reveals and parapet details. That means visual inspection alone can miss the problem.
One recurring issue is base flashing in masonry cavity walls. According to Awesim’s explanation of understanding building defects, these hidden defects were logged in 1,023 claims in the NSW Fair Trading database since 2019, with 68% linked to water ponding issues, and borescope inspections are critical for evidencing concealed failures under AS/NZS 2904.
That matters because once the flashing is hidden, the dispute usually turns on whether anyone can prove its condition without unnecessary demolition.
The tools that make the difference
A proper inspection for flashing defects often uses more than one method. Each tool answers a different question.
- Moisture meter: Helps identify increased moisture in plasterboard, timber and adjacent finishes. It is useful for mapping spread, but it doesn’t itself prove the entry point.
- Thermal imaging camera: Can show temperature variation associated with moisture pathways under the right conditions. It is helpful for narrowing the inspection area.
- Borescope: This is often the most persuasive tool where cavities, window interfaces or concealed flashing details are involved. A small access point can reveal whether flashing exists, whether it is lapped correctly, and whether debris or mortar has blocked drainage.
- Targeted opening up: Sometimes there is no substitute for exposing the detail. If used, it should be controlled, photographed and tied to a clear inspection purpose.
- Water testing: In some matters, structured hose testing can assist. It must be planned carefully so that the results are meaningful rather than chaotic.
What people often get wrong
Owners often focus only on the worst internal damage. Builders often photograph only the external finish and not the concealed condition behind it. Both approaches miss the heart of the case.
The better method is to gather evidence in layers:
- Symptom evidence showing what happened
- Construction evidence showing how the area was built
- Diagnostic evidence showing why it failed
- Cost and scope evidence showing what rectification is required
If you need an independent starting point for that process, an NCAT independant building dispute inspection can help frame the issues properly before the file becomes more adversarial.
Good evidence narrows arguments. Poor evidence multiplies them.
Keep the chain of events clear
The strongest files often include a simple chronology. Note when the leak first appeared, when the builder was told, what temporary work was done, whether the leak returned, and when expert inspection occurred.
That chronology does two jobs. It shows reasonableness, and it stops the dispute from being rewritten later by whichever party kept the better notes.
Preparing Expert Witness Reports and Scott Schedules
Once the matter moves toward NCAT, two documents become central. One is the Expert Witness Report. The other is the Scott Schedule. If either is weak, the case becomes harder than it needs to be.

Think of the expert report as the forensic file. It should identify the defect, describe the location, explain the cause, tie the issue to the relevant standard or accepted building practice, and set out the rectification method. It must be independent in tone and specific in content.
The Scott Schedule is different. It is the dispute’s working matrix. It sets out each defect item in a table so the claimant’s allegation and the respondent’s response can be compared line by line.
Why the Scott Schedule matters so much
This document has become even more important in NSW procedure. According to Awesim’s article on the use of Scott Schedule in NCAT, NCAT’s Procedural Direction 3 (2025) now mandates Scott Schedules, and NSW building defect claims rose 15% in 2024-2025 due to waterproofing issues.
That procedural shift matters in flashing disputes because these claims often involve many small but connected items. A roof to wall junction may relate to internal staining, damaged insulation, deteriorated framing, failed sealants, corrosion at fixings and repainting. Without a Scott Schedule, those issues tend to blur into general complaint. With one, each item can be tested separately.
What a proper expert report should do
A credible report in a flashing matter should answer practical questions, not hide behind jargon.
It should address points such as:
- Location: Exactly where is the defect?
- Condition: What was found on inspection?
- Causation: Is the failure due to installation, design, maintenance, material incompatibility, or a combination?
- Compliance: Which standard, detail, drawing or obligation has been breached?
- Consequences: What damage has flowed from the defect?
- Rectification: What work is necessary to fix the issue properly?
- Access and reinstatement: What has to be removed and rebuilt to complete the repair?
This is also where an expert has to stay disciplined. The report should not overreach. If the cause cannot be confirmed without opening up, the report should say so. Tribunals respect precision more than confidence unsupported by evidence.
The Scott Schedule as a working document
A Scott Schedule is not just paperwork for its own sake. It forces structure onto a dispute that often starts in a cloud of emails and frustration.
A useful schedule will usually include:
| Item | Claimant position | Respondent position | Expert view |
|---|---|---|---|
| Roof to wall flashing | Missing or non-compliant flashing causing water ingress | Leak due to maintenance or unrelated issue | Sets out observed condition and whether defect is substantiated |
| Window head flashing | Omitted or ineffective flashing detail | Window itself is sound, issue lies elsewhere | Identifies detail, causation and required rectification |
| Masonry base flashing | Insufficient height or blocked drainage path | No defect visible externally | Refers to borescope or opening-up evidence |
| Damage rectification | Internal and external repairs required | Limited patching only | Distinguishes temporary repair from proper remedial scope |
For readers who want a closer explanation of format and use, this guide on what is a Scott Schedule in a building dispute NSW guide is worth reviewing.
A short video also helps if you’re trying to understand how these documents fit into the broader dispute process.
The Tribunal doesn’t need more indignation. It needs a defect list it can work through.
What works and what fails at this stage
What works is restraint, detail and consistency. The defect description should match the photographs. The photographs should match the report. The report should match the Scott Schedule.
What fails is inflation. If every stain becomes a major structural issue without evidence, the strong items in the case can lose force. In flashing disputes, the most persuasive files are usually the ones that separate confirmed defects, probable defects and issues requiring further investigation.
Your Step-by-Step Guide Through the Dispute Process
The process differs depending on whether you are the owner, the builder, or the solicitor coordinating the matter. The technical issue may be the same, but each party has a different job.
One of the recurring technical arguments is whether the failure arose from design or installation. In the NSW context, data adapted from industry analysis suggests 60% of cases attribute failures to installation workmanship, which is why the expert’s distinction between design fault and workmanship fault matters so much in practice, especially in rural areas exposed to harsh weather, as discussed in this analysis of flashing failures and detail responsibility.
If you are a homeowner
Start in a measured way. Don’t jump straight to accusation if the cause hasn’t been properly identified.
- Document the problem early. Record internal and external symptoms, dates, weather conditions and all communications.
- Notify the builder in writing. Be specific about what you observed and where. Ask for inspection, not just patching.
- Avoid repeated cosmetic repairs. Repainting or resealing without diagnosis can complicate the evidence.
- Get an independent assessment if the response is unclear or disputed. This is often the point where the matter either becomes clearer or becomes formal.
- Use Fair Trading and NCAT procedures if needed. Once the issue is contested, the file needs structure.
If you are a builder
The worst response is a defensive one unsupported by site investigation. A poor reply can harden a dispute that may have been resolved early.
A stronger response usually involves:
- Inspecting promptly and keeping your own records
- Reviewing drawings, variations and subcontract scopes
- Checking whether the alleged defect is visible, concealed, or related to another trade
- Avoiding vague statements like “it’s maintenance” unless you can support that position
- Proposing a defined inspection and rectification path rather than an open-ended promise
Builders often help themselves by separating immediate make-safe work from final causation findings. That keeps the site protected without conceding more than the evidence supports.
If you are a solicitor
The legal strategy improves when the brief to the building expert is narrow, organised and tied to the issues in dispute.
A useful brief usually includes:
- the contract and plans
- any relevant variations
- the chronology of complaint and response
- photographs and videos
- prior inspection reports
- the exact questions that need answering
A good expert brief asks for findings on cause, compliance, scope and rectification. It doesn’t ask the expert to guess what the legal case might become.
The practical sequence that tends to work
Not every matter follows the same route, but the cleaner path is usually this:
| Stage | Focus |
|---|---|
| Initial complaint | Record symptoms and notify the other party |
| Early inspection | Confirm whether flashing is a realistic cause |
| Evidence phase | Gather documents, photographs and diagnostic findings |
| Formal defect articulation | Identify the alleged defects precisely |
| Expert reporting | Tie each issue to observed facts and standards |
| Scott Schedule preparation | Present each disputed item in a structured form |
| NCAT progression or settlement | Resolve based on evidence strength |
The people who usually get the best outcomes aren’t always the loudest. They are the ones who keep the issue defined, the documents organised, and the expert evidence aligned with the actual dispute.
Achieve Certainty With Awesim Building Consultants
A building dispute about flashings is rarely just about one piece of metal or one leaking junction. It usually sits at the intersection of workmanship, compliance, causation, hidden damage and procedure. That’s why these matters become stressful so quickly.
The good news is that they are manageable when the defect is investigated properly and the evidence is presented in a form that Fair Trading, NCAT, insurers and legal representatives can use. Most of the wasted time in these disputes comes from uncertainty. Nobody is sure where the water is entering. Nobody is sure which standard applies. Nobody is sure whether the defect is installation, design, maintenance, or some combination of those factors.
That uncertainty is exactly what careful building investigation is meant to remove.
With 35+ years in building and construction and more than 15 years providing litigation support to homeowners, builders and lawyers, Awesim Building Consultants provides the practical assistance these matters require. That includes site investigations, Building and Construction Expert Witness Reports, and Scott Schedules prepared for NSW building disputes.
For homeowners, that means clear defect identification and a realistic rectification pathway. For builders, it means an independent assessment that separates allegation from evidence. For solicitors, it means reports and schedules that can support a case strategy rather than complicate it.
If you’re dealing with recurring water ingress, a contested roof to wall junction, failed window flashing, concealed masonry moisture, or an NCAT matter that needs proper building evidence, the right next step is to get the defect assessed before positions harden further.
The aim isn’t to create more conflict. It’s to replace assumption with facts.
If you need an independent assessment, expert witness reporting, or an NCAT-compliant Scott Schedule, contact Awesim Building Consultants. Email admin@awesim.com.au or call 1800 293 746 to discuss your matter.


