
A lot of people arrive at this issue the same way. They don’t start by asking about bathroom waterstops. They start with a musty smell, a skirting board that’s swelling, a paint blister on the other side of the shower wall, or tiles that never seem to dry out properly.
By then, the visible symptom is rarely the full problem. In many bathroom defect matters, the trouble sits under the tile line, at the shower edge, where water was supposed to be stopped, contained and directed back to the waste.
The Hidden Cause of Costly Bathroom Leaks
A shower is used for months without complaint. Then the skirting outside the bathroom swells, the paint on the opposite wall starts to bubble, and a musty odour settles in. The first response is usually maintenance. Regrout the joints. Reseal the screen. Replace the silicone. In defect work, that sequence often delays the underlying diagnosis.
One concealed detail regularly sits at the centre of the problem. The bathroom waterstop.
A waterstop is a small component, but it can decide whether water remains inside the shower system or travels into adjacent finishes and structure. Once water gets past the wet area boundary beneath the tile finish, the issue stops being cosmetic. It becomes a question of defective waterproofing, damaged substrates, and, in many matters, liability.
For homeowners trying to separate a plumbing leak from a waterproofing failure, a basic homeowner’s guide to leak detection is a useful starting point. That early distinction matters. If the source is concealed migration through the shower assembly rather than a failed pipe or fitting, the inspection method, rectification scope, and legal pathway are different.
In practice, failed or missing waterstops are easy to overlook because the visible damage rarely starts at the point of entry. Moisture may track under tiles, through mortar beds, into sheet joints, around doorway transitions, or along the base of wall framing before any occupant sees a stain. By the time symptoms appear, the shower may have been leaking for a long period.
That is why these matters often become larger than owners expect.
Typical consequences include:
- Damage at bathroom thresholds and adjoining rooms: Moisture spreads beyond the shower footprint and affects floor finishes, skirtings, architraves, and door jambs.
- Breakdown of substrates and bonding materials: Wet sheeting, deteriorated timber, debonded tiles, and softened adhesives increase the repair scope.
- Mould and hygiene issues in concealed spaces: The risk usually sits behind finishes and inside cavities, not on the tile face.
- Escalation into a defect claim: Once demolition is required to confirm the pathway, the dispute often turns on whether the original work complied with AS 3740 and good trade practice.
I see this point missed in both construction and litigation. Parties focus on surface sealants because they are visible and cheap to replace. The fundamental question is whether the shower perimeter was built to stop concealed water migration in the first place, and whether there is enough evidence to prove that failure if the matter ends up in NCAT or a court-ordered expert process.
What Exactly Is a Bathroom Waterstop
A bathroom waterstop is best understood as a miniature dam built into the shower perimeter. It’s not there to be seen. It’s there to interrupt water movement below the tile finish and keep that movement within the waterproofed zone.
What it does inside the system
Tiles and grout are not the waterproofing system. They are the wear surface. The essential control layer sits underneath, where the membrane and the waterstop work together. The membrane manages moisture across the substrate. The waterstop provides a physical termination point so water can’t continue past the intended wet area.
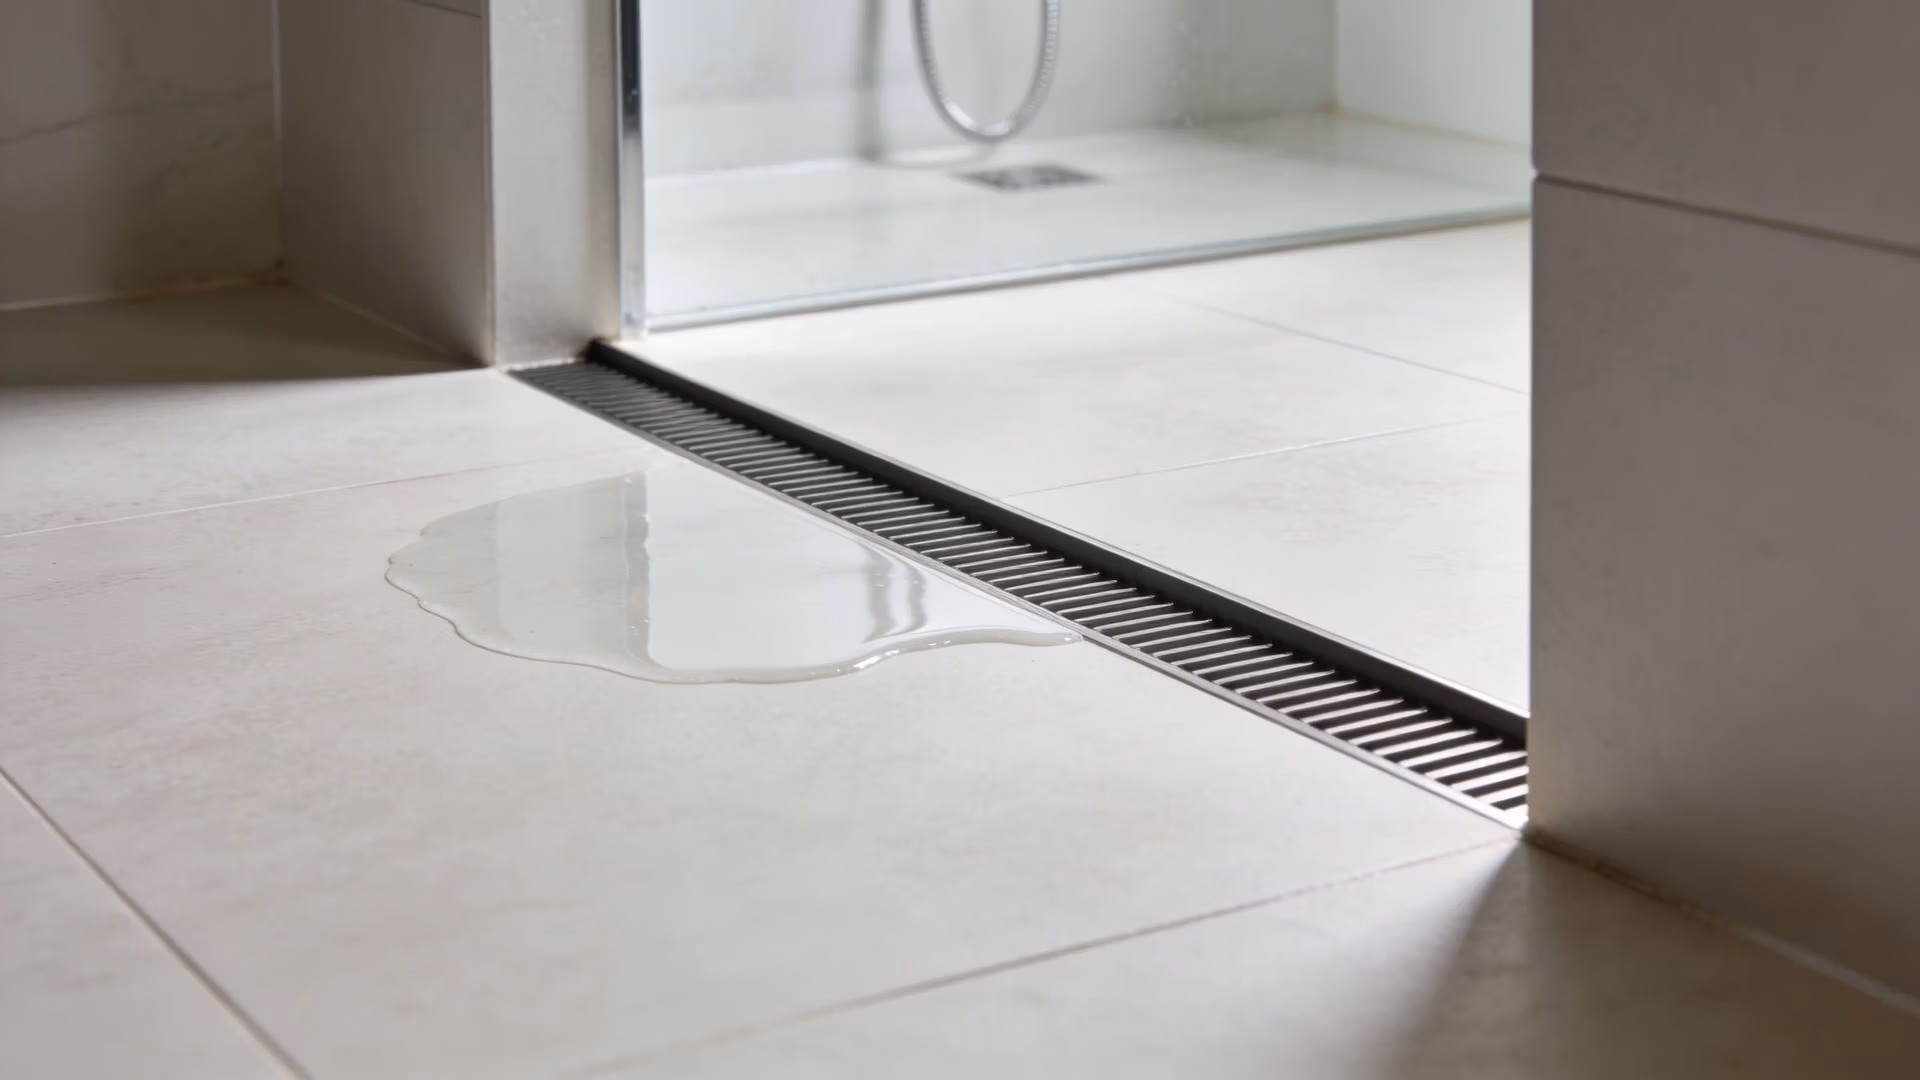
In showers without a raised hob, that role becomes even more important. Without a proper stop, water can migrate laterally beneath the tiles and move into adjacent floor areas, wall framing or doorway transitions.
A compliant waterstop is part of the waterproofing assembly, not an optional accessory. It must be coordinated with the floor build-up, wall junctions, membrane, falls and finished tile levels.
What it is not
People often confuse a waterstop with other bathroom elements. They are not the same thing.
- Not a shower screen: A screen controls splash. It does not stop concealed water migration below the tile surface.
- Not a tiled hob by itself: A hob may form part of the boundary, but the waterproofing and termination details still matter.
- Not silicone at the doorway: Surface sealants can fail, wear away or be cut during maintenance. A waterstop is a built-in barrier.
That distinction is where many disputes start. A bathroom can look neat, modern and freshly tiled, yet still be defective because the concealed edge detail was omitted or installed incorrectly.
A short demonstration of waterproofing layout helps make that point more clearly:
Water damage claims often turn on details nobody could see after tiling. That’s why pre-tile inspection records matter so much.
Where bathroom waterstops usually sit
In practice, bathroom waterstops are commonly installed at:
- Shower entries, especially in hobless and unenclosed layouts
- Doorway thresholds where the wet area meets a dry area
- Extremities of the shower zone where water needs a hard stop before transitioning to adjacent floor finishes
The key point is simple. If the design expects water to stay within one part of the bathroom, the build needs a physical way to enforce that expectation below the tiles.
Waterstop Types Materials and AS 3740 Compliance
A waterstop can be made from several materials and still fail the job if the profile, height, or placement do not match the bathroom layout. In defect work, I often see attention go to the product brochure while the actual issue is simpler. The installed detail does not meet AS 3740, or it cannot be verified once the tiles go down.
For unenclosed showers, AS 3740:2024 requires the waterstop’s vertical leg to finish flush with the finished floor surface. If that leg is buried below tile level, the barrier loses the geometry it relies on to stop lateral water movement. That defect appears regularly in wet area complaints and is one of the reasons pre-tiling photos matter so much in later disputes.
Common forms used on site
Residential projects usually rely on a small group of practical profiles:
- L-angle sections: Common at shower entries and floor transitions where a straight, defined stop is needed.
- Pre-formed corners: Used to maintain continuity through internal and external corners without site-cut gaps.
- Integrated proprietary systems: Chosen where the waterproofing manufacturer provides matching components, sealants, and set-out details.
Selection is a buildability question as much as a product question. A profile that looks fine on paper may be difficult to set accurately at a doorway, around a nib wall, or across an out-of-square slab. For owners and lawyers, that distinction matters because many failures start with an apparently minor set-out compromise that was never recorded.
Comparison of Bathroom Waterstop Materials
| Material | Pros | Cons | Best For |
|---|---|---|---|
| PVC | Easy to form, commonly available, suits many standard residential details | Can deform if poorly supported or joined badly | Straight shower threshold details |
| Aluminium | Rigid, stable, helps maintain a clean line | Requires careful sealing and consideration of interface compatibility | Projects where straightness and edge definition are priorities |
| Flexible composite systems | Better suited to irregular junctions and movement-prone details | Product choice and installation sequence need close control | Complex layouts and proprietary membrane systems |
Trade-offs are real. Aluminium gives a crisp line and is easier to inspect for straightness, but interface detailing needs care. PVC is forgiving during set-out, but it can be damaged or distorted before the membrane and tile assembly lock it in place. Composite systems can solve awkward junctions, though they demand disciplined sequencing from the installer.
For a broader explanation of terminology and common defect pathways, see this guide to water stops in showers.
Performance in practice
Site performance usually turns on three questions. Was the profile suitable for the layout? Was it installed at the correct height relative to the finished floor? Could anyone prove that before the work was covered?
Recurring failure patterns include:
- Vertical legs set too low, which allows water to track beyond the intended wet area boundary
- Site-cut sections with poor corner continuity, especially where separate pieces are patched together
- Mixed materials without a clear sealing strategy, creating weak points at junctions and terminations
A waterstop is judged by its finished position and continuity, not by the fact that one was purchased and installed somewhere under the tiles.
That distinction becomes important in disputes. In NCAT matters and expert report work, the argument often shifts from product selection to evidence. If the builder cannot show the installed height, continuity, and compatibility with the membrane system before tiling, the case becomes harder to defend, even where a nominally compliant product was used.
Critical Installation and Connection Details
A compliant product can still fail in a non-compliant installation. That’s the point many owners, and sometimes trades, miss. Bathroom waterstops succeed or fail at connection points.
The wall and floor junction
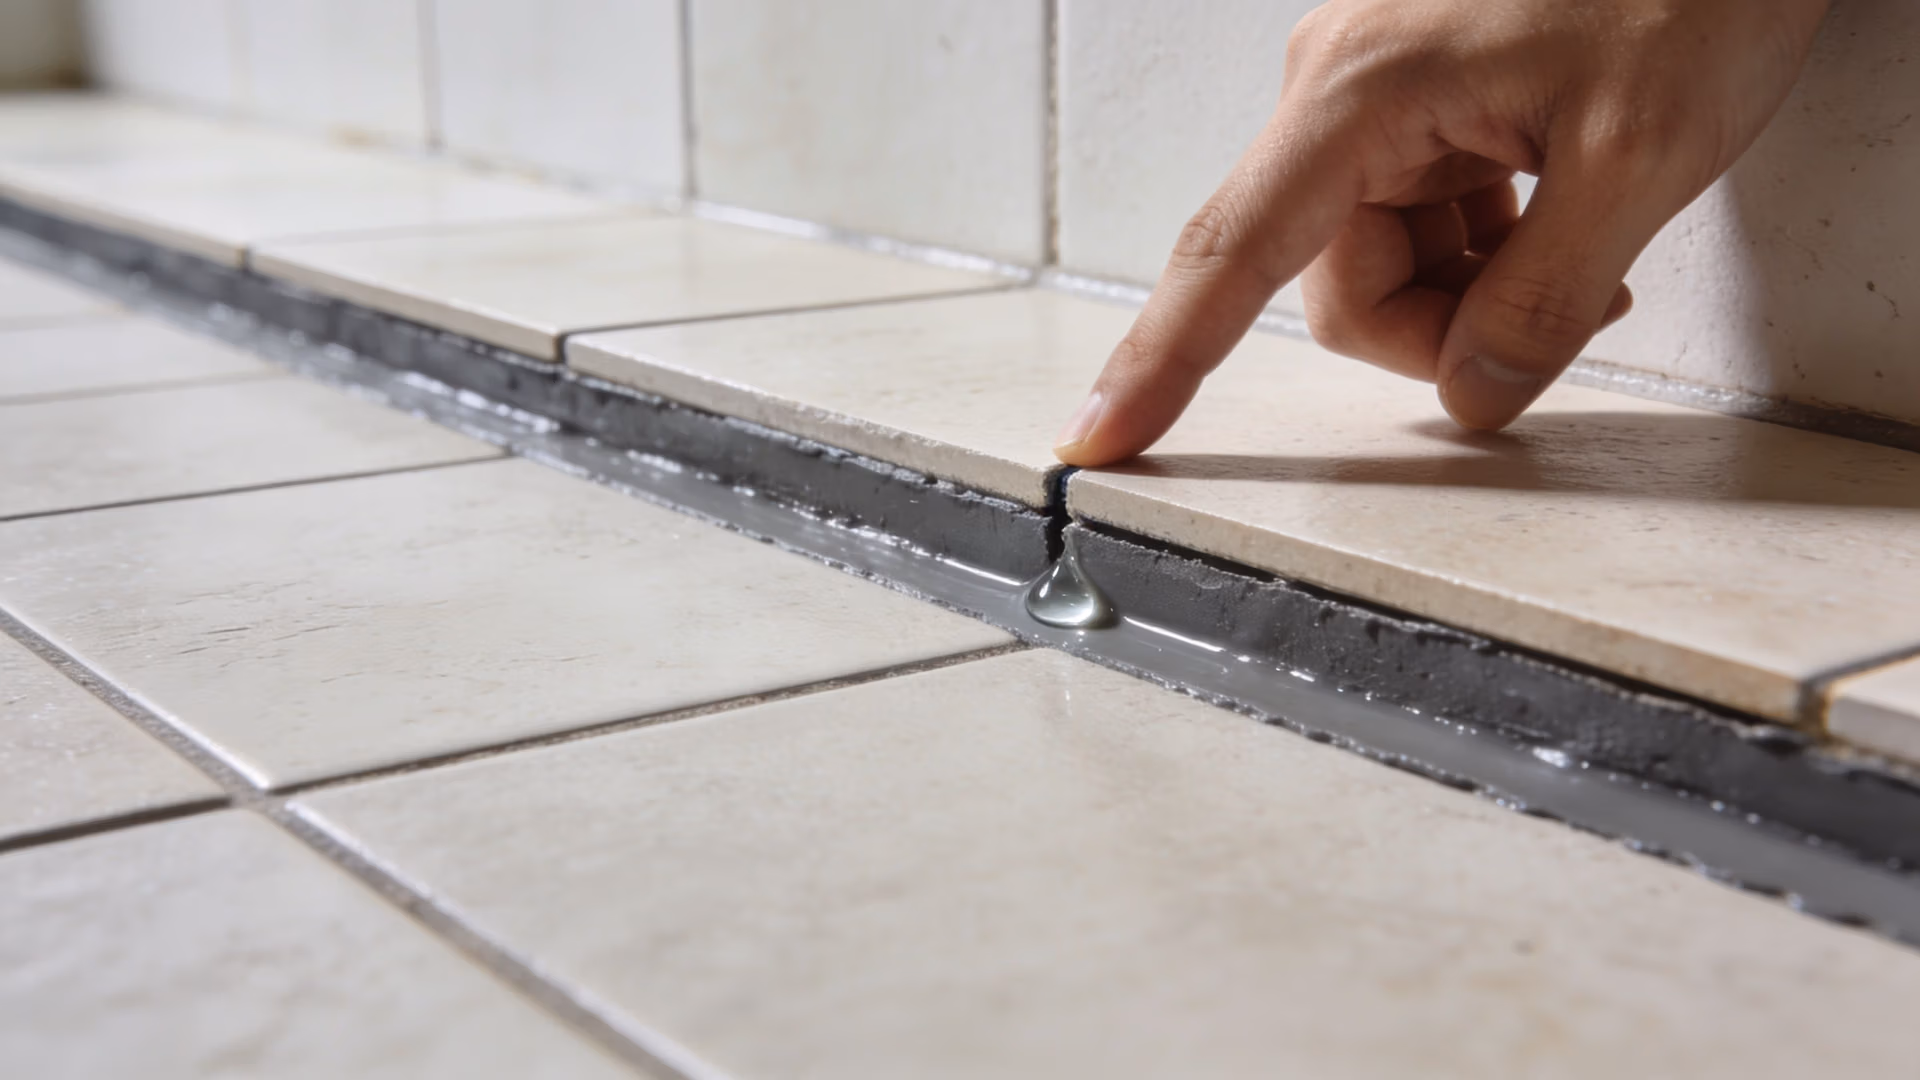
Where the waterstop meets the wall line, the detail has to be continuous. Any break, poor junction, or unsealed transition becomes a pathway. Water doesn’t need a large opening. A small discontinuity at a corner can be enough for moisture to track beyond the wet area.
The standard requires the waterstop to be integrated with the membrane system. In practice, that means the barrier and the membrane must act as one assembly. If the waterstop sits in place mechanically but isn’t sealed and tied into the surrounding waterproofing, it’s not doing the job it was installed for.
The doorway and shower extremity
Doorways are a frequent weak point because they sit at the transition between expectation and reality. The design expects the wet area to end there. The construction doesn’t always enforce it.
For Type 1 and Type 2 unenclosed showers, the relevant standard guidance requires the waterstop’s vertical leg to finish flush with the finished floor surface, and junctions must be waterproofed using compatible sealants. The same source notes that installers should pre-seal waterstops to perimeter flashings with a polyurethane sealant, using a visible bead before tiling so the detail can be inspected, as explained in the earlier linked KBDi guidance.
If that seal is hidden too early, skipped, or broken during later works, the defect may remain invisible until the adjoining floor starts showing distress.
The pre-tile inspection moment
The most important inspection often happens just before tiling. Once the tile bed, adhesive and finished surface go down, the decisive evidence disappears.
A practical site review should confirm:
- Continuity: The waterstop runs without unintended breaks.
- Height relationship: The vertical leg is at the correct finished floor position.
- Sealant and membrane tie-in: The connection is complete and visible.
- Corners and returns: Junctions are formed, not guessed.
If a builder can’t show the detail before tiling, the argument later usually becomes harder and more expensive.
Many bathroom failures aren’t caused by one dramatic mistake. They come from a sequence of small shortcuts. A waterstop set a little low. A corner not formed properly. A membrane lapped untidily. Adhesive or debris covering the inspection point. Each decision on its own may seem minor. Together, they create the leak path.
Identifying Common Waterstop Defects and Failures
A bathroom can look finished, clean and recently renovated, yet still contain a leak path at the shower edge. By the time the skirting swells outside the bathroom or the wall base starts reading wet, the failed detail is usually buried under tile, adhesive and grout.
That is why waterstop defects matter in practice. They are small installation errors with expensive consequences.
Buried or low-set waterstops
In hobless showers, one recurring defect is a waterstop set too low relative to the finished floor level. Sometimes the vertical leg is buried in the tile build-up. Sometimes it is present in theory but offers no effective barrier once the floor layers are complete.
Water then travels at or below surface level and escapes the shower area without any obvious overflow event. Owners often describe these as intermittent leaks because the bathroom only shows damage after repeated use.
Common signs include:
- dampness near the bathroom entry
- swollen skirtings or architraves outside the shower zone
- moisture at the base of adjacent walls
- mould growth at room edges or in the next room rather than inside the shower itself
Gaps at joins and corners
Corners and returns are where poor workmanship is exposed. A straight section of waterstop is rarely the whole problem. Failures usually occur where sections are cut, joined, turned into a wall, or interrupted at a doorway.
A gap of only a few millimetres can be enough. Water does not need much space. Once it finds a discontinuity at a corner or threshold return, it can track into the wall base or under the bathroom floor finish for months before visible damage appears.
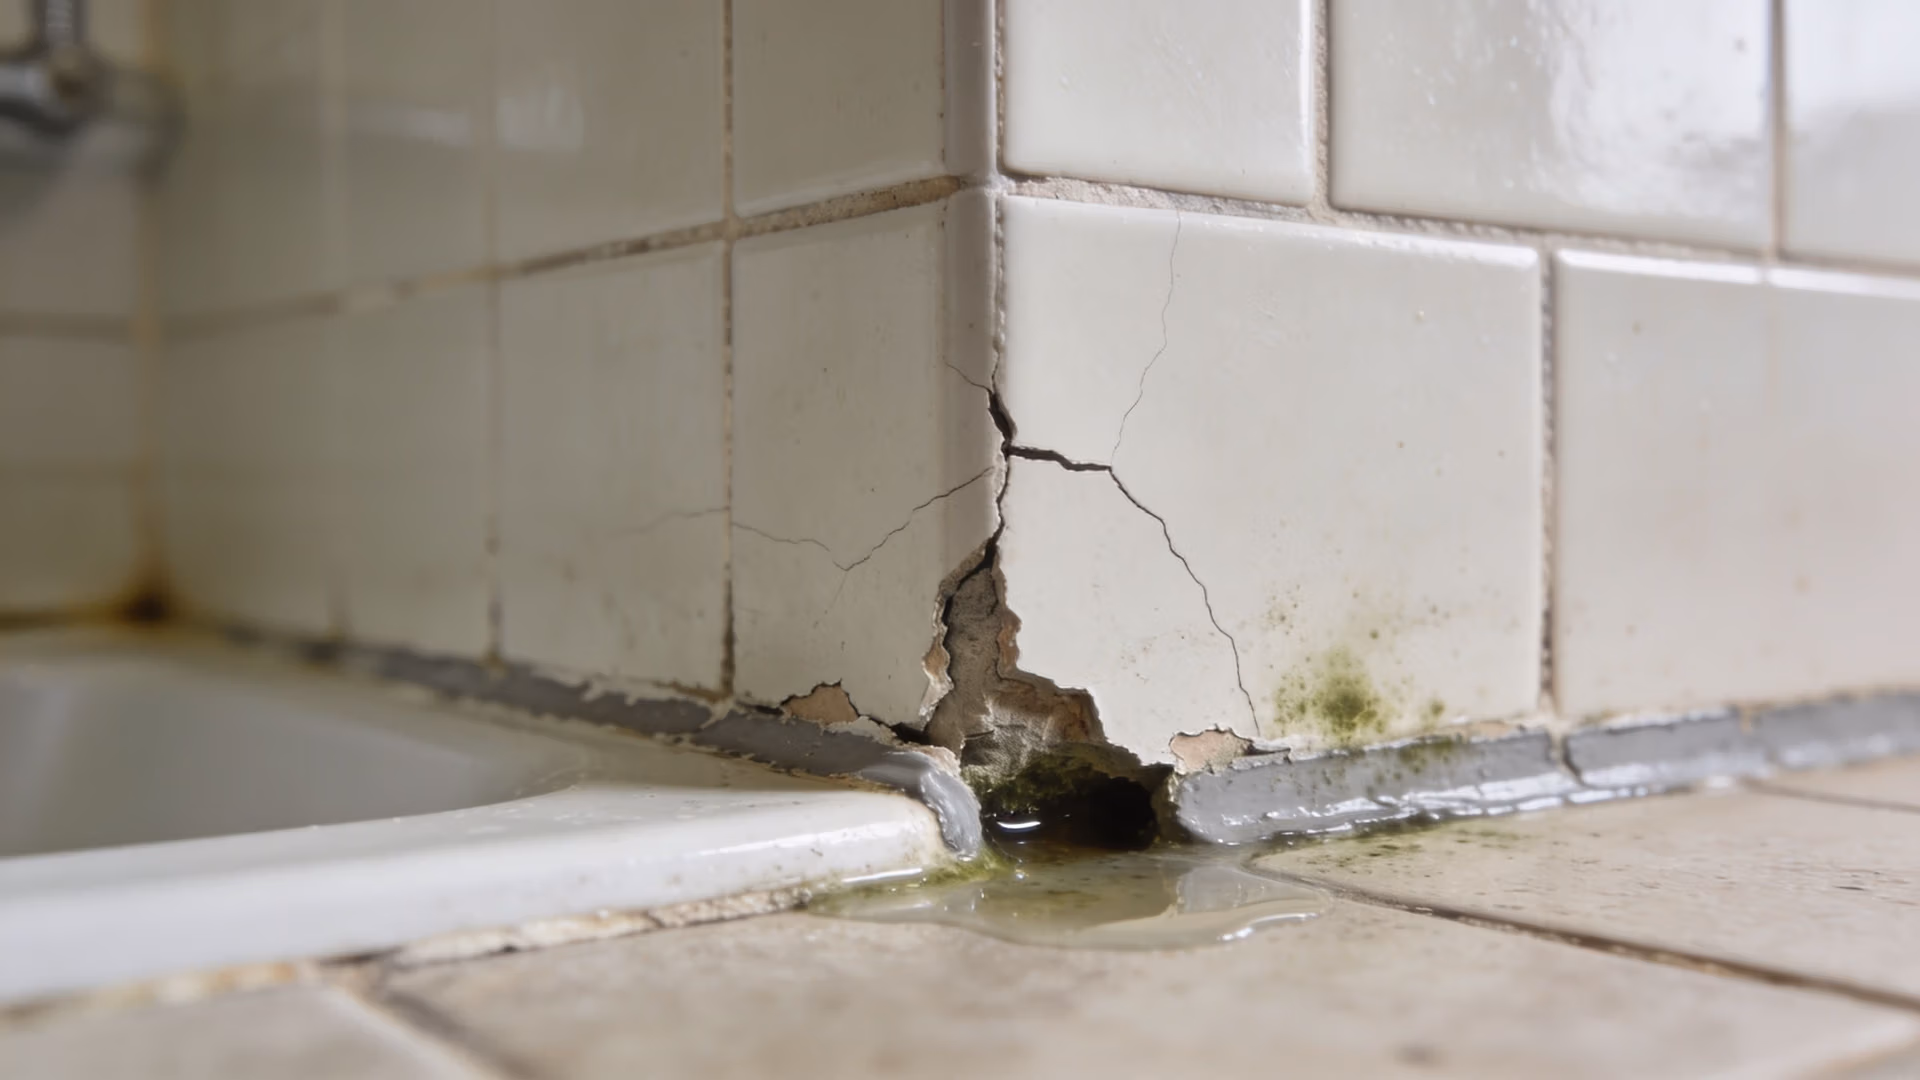
In dispute work, these corner defects are often missed on the first pass because the tile surface still appears sound.
Poor membrane integration
A compliant waterstop detail depends on continuity with the waterproofing system. If the membrane does not bond properly to the stop, terminates short, or is damaged during later trades, the assembly no longer controls water where it is supposed to.
I see this issue regularly in renovations where the specified products were appropriate but the sequencing was poor. The builder can point to a membrane, a waterstop and tiles, yet the junction between them was never formed properly or was contaminated before curing.
Typical failure patterns include:
- unsealed interfaces before tiling
- dust or moisture at the bond line
- cuts, punctures or displacement after waterproofing
- membrane finishes that do not return cleanly into the transition detail
Incorrect treatment at walls and transitions
Some of the most expensive claims start as floor-level defects and present later as wall damage. Water bypasses the stop at a wall return or transition, then shows up as swollen lining, damaged paint, mould, or decay at the base of the partition.
That presentation causes confusion. Owners suspect a plumbing leak. Builders blame sealant or grout. Lawyers are then left sorting out whether the issue is maintenance, workmanship, design, or all three.
The answer usually sits in the concealed threshold and wall junction detail. A properly prepared waterproofing defect report should connect the observed damage to that concealed pathway, the construction sequence, and the relevant standard.
Defects that turn into disputes
Waterstop failures rarely stay limited to one trade or one room. Once moisture reaches framing, skirtings, carpets, door jambs, or the room next door, the rectification scope expands quickly. Demolition becomes necessary to expose the detail, identify the leak path, and separate waterproofing defects from consequential damage.
Awesim’s experience in NSW defect and NCAT matters is that inadequate, missing, or poorly connected waterstops are a recurring cause of shower leak disputes. The pattern is familiar. The original defect is concealed, the symptoms appear later, and the actual cost sits in investigation, strip-out, drying, reinstatement, and argument over responsibility.
That is the practical problem with waterstop failures. The defect is often simple. Proving it after completion is not.
Inspecting and Documenting Failures for NCAT
Finding a defect is only half the job. In a dispute, the fundamental question is whether the defect can be demonstrated clearly, measured properly and linked to the relevant standard and resulting damage.
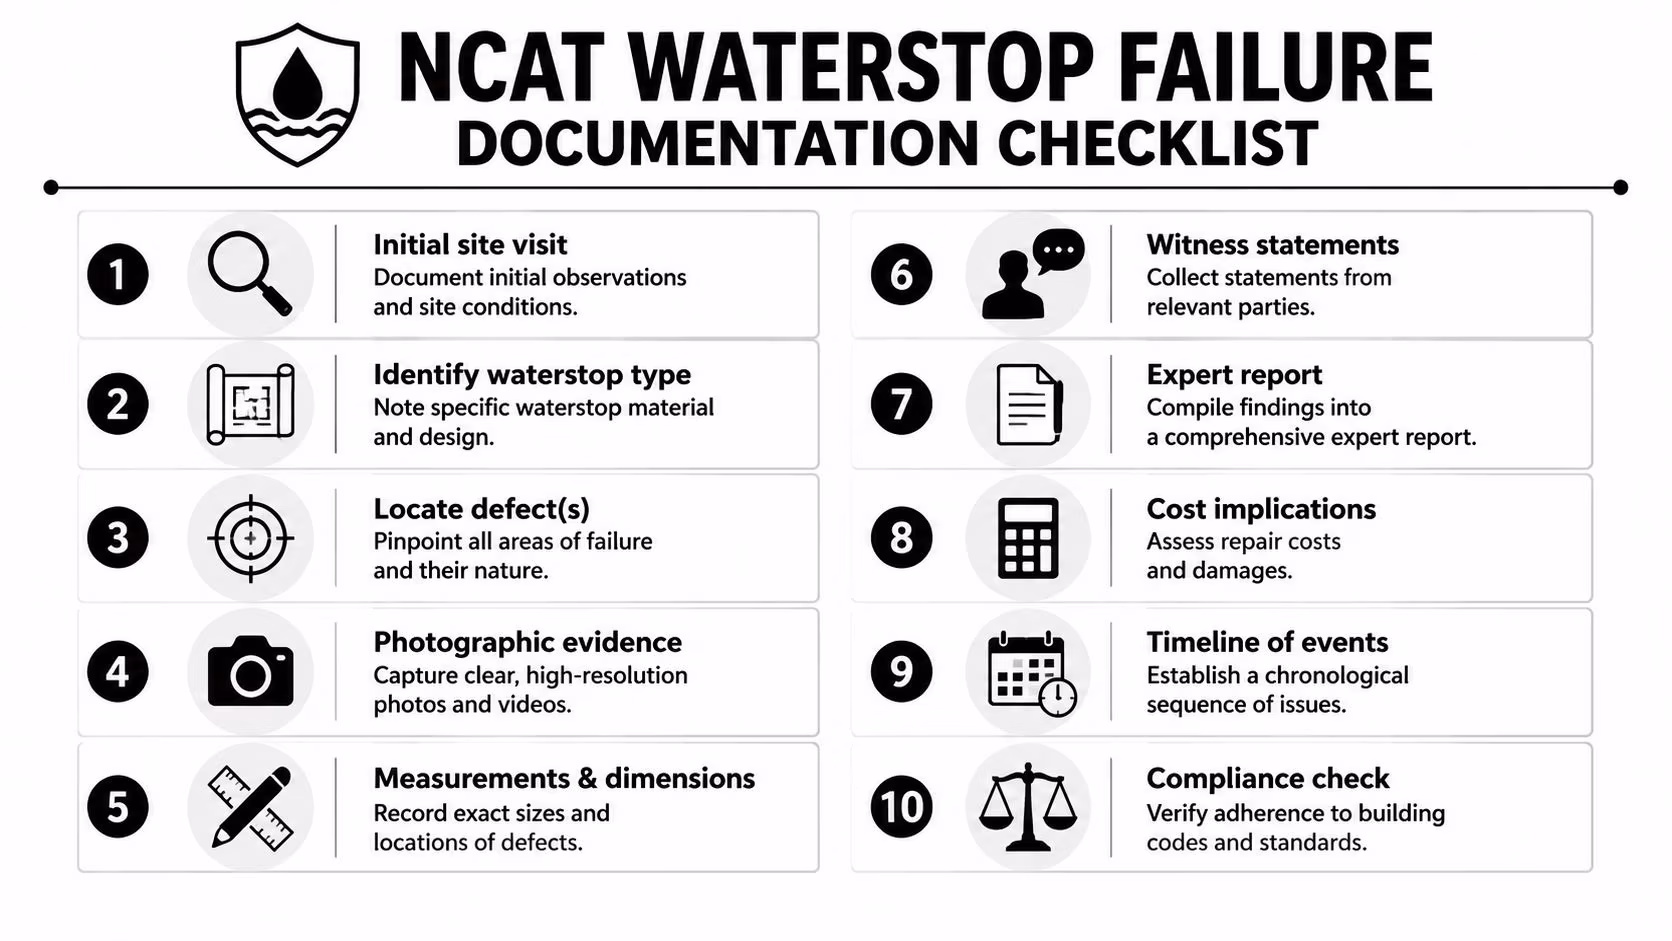
What to record on the first inspection
The first site visit should establish condition, pattern and probable pathways. That means more than taking a few photographs of a stained skirting.
Record:
- Visible symptoms: Staining, mould, swollen trims, cracked grout, deteriorated sealant, tile movement.
- Location logic: Is the damage confined to the shower perimeter, doorway, adjacent room side, or lower wall zone?
- Moisture pattern: Note whether readings or physical signs reduce with distance from the shower threshold or wall return.
- Construction clues: Look for hobless entries, unenclosed layouts, recent renovations, or transitions that suggest a buried waterstop.
The inspection notes need to be disciplined. “Bathroom leaking” is not useful. “Increased moisture at shower entry consistent with failure at threshold barrier detail” is.
When invasive inspection becomes necessary
Many waterstop issues cannot be verified conclusively without opening the assembly. That doesn’t mean demolition should be the first move in every matter. It means the consultant has to know when visual indicators are no longer enough.
In disputed work, the decisive evidence is often hidden under tile and adhesive. Awesim Building Consultants’ experience in over 1,200 NCAT cases shows that 70% of successful water-related defect claims hinge on site-specific evidence, like waterstop height measurements, which are often buried under tiles and require an expert to document correctly for the Tribunal, as noted in guidance on waterproofing defect water stop heights.
That’s why measurement matters. Not broad impressions. Actual dimensions, recorded at the exposed point, with location references and supporting photographs.
Turning observations into NCAT evidence
For NCAT purposes, the evidence should be organised so someone who never attended site can follow the logic. That usually means:
- Chronology first: When symptoms appeared, what investigations occurred, and what rectification was attempted.
- Photo sequencing: Wide shots, mid-range context shots, then close-up detail shots with scale.
- Measured findings: Height relationships, defect locations, exposed section details, substrate condition.
- Standard references: Identify the relevant compliance issue without overreaching or speculating.
- Damage linkage: Explain how the defect plausibly caused the observed moisture ingress and consequential damage.
A properly prepared waterproofing defect report can then be used to support an Expert Witness Report or form part of a Scott Schedule.
NCAT doesn’t reward vague certainty. It responds better to measured evidence, clear photographs and a logical chain between defect, non-compliance and damage.
Common mistakes in evidence gathering
The avoidable errors are usually procedural:
- Photos without scale: A close-up image means very little if no one can tell size or location.
- No pre-removal record: Once demolition starts, the original condition is gone.
- Conclusions without measurements: Especially where waterstop height is the live issue.
- Mixed terminology: Calling every moisture issue a “leak” without identifying whether the defect is plumbing, waterproofing, or both.
For lawyers and owners, that distinction can decide whether the matter settles early or runs into a longer fight over causation.
Remediation Guidance and Expert Consultation
Once a bathroom waterstop is proven defective, rectification is rarely a surface repair. In many cases, the tiled finish has to come up so the concealed assembly can be exposed, assessed and rebuilt properly. That’s why early compliance is cheaper than late argument.
For builders, the practical lesson is supervision. The detail must be right before tiling. For homeowners, it’s documentation. Keep progress photos and insist on pre-tile inspection records. For lawyers, it’s specificity. The claim gets stronger when the defect is tied to a measured site condition, not just a general complaint about waterproofing.
Where consequential water damage extends into adjoining rooms or wall bases, other risk management issues can follow, including contractor scope, remediation responsibility and insurance position. For firms involved in restoration work, resources such as business insurance for restoration contractors can help frame those broader commercial risks.
Bathroom waterstops are a small detail with large consequences. If the barrier is wrong, the bathroom can look complete and still be defective. If the evidence is poor, a valid claim can still struggle. Both problems are preventable.
If you need an independent inspection, an Expert Witness Report, or a Scott Schedule for a bathroom waterproofing or waterstop dispute, contact Awesim Building Consultants. Email admin@awesim.com.au or call 1800 293 746.


