
A lot of people only learn what a bathroom waterstop is after something has already gone wrong. The renovation looks finished, the tiles are new, the shower screen is in, and then the skirting outside the bathroom starts to swell, paint blisters on the other side of the wall, or the room next door picks up that damp smell that wasn’t there before.
That’s usually the point where the conversation shifts from renovation to defect. If the matter is heading toward NCAT, the issue also shifts from frustration to evidence. It’s no longer enough to say the bathroom leaks. You need to identify what failed, where it failed, whether it was required, and whether the installation can be shown to be non-compliant.
That’s where waterstops in bathrooms become critical. They’re small, easy to miss once tiling is complete, and often treated by inexperienced trades as a minor trim detail. They are not minor. In many bathroom failures, the waterstop is either missing, wrongly placed, wrongly sequenced, or installed in a way that can’t perform once the bathroom is in service.
For homeowners, builders, and solicitors, this is one of those details that often decides whether a complaint remains an argument about workmanship or becomes a clear compliance issue supported by inspection evidence.
The Hidden Cause of Bathroom Leaks
A common pattern appears in dispute work. The bathroom is relatively new. The owner reports water escaping the shower area, damage appears outside the wet area, and the builder says the shower was waterproofed. Sometimes that statement is technically true. There is a membrane somewhere under the tile bed. There may even be a metal angle at the opening. But the bathroom still leaks because the part that should have stopped water leaving the shower zone was never installed properly as a functioning barrier.
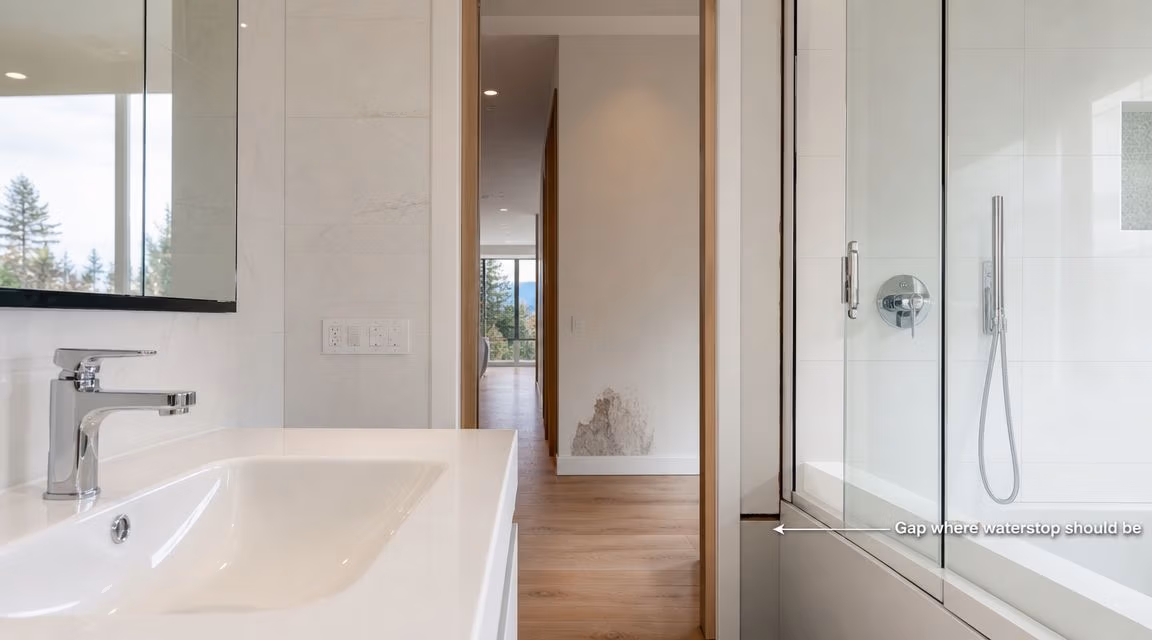
In practical terms, the waterstop is one of the first things I want to understand when a bathroom leak is reported at a shower entry or doorway. If water can sheet out of the shower area and into adjacent finishes, the defect often sits at that threshold. By the time the owner sees swollen architraves, lifting flooring, or staining to the wall base, the fault may already be concealed beneath tiles.
Why this small detail causes large disputes
Bathrooms fail in predictable places. Openings, junctions, corners, penetrations, and transitions between wet and dry areas are where defects show up. A waterstop sits at one of the most exposed control points in the room. If it’s absent, too low, discontinuous, or not integrated into the waterproofing system, the whole assembly is compromised.
A bathroom can look well built and still fail at the opening because the visible finish tells you very little about what was done underneath.
That matters in NCAT work because a good report doesn’t rely on opinions about whether a bathroom “should have performed better”. It identifies a missing or defective component, ties it to the standard, and records the site evidence clearly.
Why documentation matters early
Once rectification starts, evidence disappears quickly. Tiles come up. trims get removed. silicone gets reapplied. If a dispute is brewing, early inspection is often the difference between a reportable defect and a reconstruction of what might have been there.
Awesim Building Consultants bring over 35 years in building and construction and more than 15 years providing litigation support to homeowners, builders, and lawyers. In bathroom matters, that experience is less about theory and more about recognising what fails on site, how to document it, and what will stand up in a report or tribunal setting.
What Exactly Is a Bathroom Waterstop
A waterstop is best understood as a built-in barrier. It acts like a mini-dam inside the floor and wall assembly. Its job is simple. Keep water inside the wet area and stop it migrating into adjoining finishes.
That description is useful for owners because many people confuse a waterstop with a trim, an aluminium angle, or a bead of sealant. A trim finishes an edge. Sealant closes a surface gap. A waterstop does a different job. It forms part of the waterproofing system itself.
The formal definition matters
Australian practice has moved away from treating waterstops as an informal builder’s detail. Under industry guidance discussing AS 3740:2021 requirements, a waterstop is defined as a “vertical extension of the waterproofing system forming a barrier to prevent the passage of moisture”. That same guidance notes that it is required at wet-area doorways and shower perimeters.
That wording matters in disputes. It tells you two important things:
- It is part of the waterproofing system, not separate from it.
- It forms a barrier, which means it has to be continuous and functional, not decorative.
What a waterstop is not
A lot of non-compliant work comes from treating the threshold like a finishing issue rather than a waterproofing detail. That usually shows up in one of these ways:
- Loose angle after tiling. A strip is added late, sitting on top of finished tiles, with no proper integration to the membrane.
- Silicone used as the only barrier. Sealant can assist a junction, but it does not replace a properly installed waterstop.
- Flat threshold with no vertical leg. If there is no actual upstand or formed barrier where one is required, water is free to travel.
Practical rule: If the membrane cannot be sealed to the waterstop because the sequencing was wrong, the installation is already on the back foot.
Why modern bathrooms get this wrong
Hobless showers and open-plan layouts look clean, but they reduce tolerance for sloppy work. In older bathroom layouts, a hob or screen often gave installers a more obvious physical boundary. In modern layouts, that boundary still has to exist within the system. It just has to be planned and installed with more care.
For a homeowner or solicitor, the useful takeaway is this. If water is leaving the shower area, don’t focus only on grout, tiles, or shower screens. Ask whether there is a true waterstop there, whether it was required, and whether it was installed as part of the waterproofing system rather than added as an afterthought.
Common Types of Waterstops and Their Applications
On site, you’ll see a range of products and profiles described as waterstops. Some work well in the right setting. Some are misused. Some aren’t really waterstops at all, even though trades refer to them that way.
The first question isn’t what material was used. The first question is whether the product selected could be integrated into the waterproofing system and installed at the correct location for the shower design.
What inspectors commonly encounter
Rigid angles are common at straight thresholds. Flexible profiles can help where movement or awkward geometry is involved. Pre-formed systems can make sequencing easier if the installer follows the manufacturer’s process. The product choice matters, but the installation detail matters more.
Here’s a practical comparison.
Waterstop Type Comparison
| Type | Material | Best Application | Key Advantage |
|---|---|---|---|
| Rigid angle profile | PVC or metal | Straight shower entries and simple threshold runs | Provides a clear formed barrier line |
| Flexible profile | Rubber or similar flexible material | Junctions where some movement accommodation is useful | Easier to fit into irregular layouts |
| Hydrophilic profile | Swelling waterstop material | Specialised junctions and difficult penetration-related details | Reacts to moisture exposure in the right system |
| Pre-formed flange system | Factory-made integrated component | Controlled installations where compatibility and sequencing are planned early | Can simplify membrane connection points |
What tends to work well
Rigid PVC-style threshold profiles are often practical in standard shower entry conditions because they give a defined vertical leg and a clean line for membrane integration. In a straightforward recess or opening, that clarity helps both the installer and the inspector.
Flexible systems can be useful where substrate variation or detailing complexity makes a rigid profile harder to seat properly. They are not a cure for poor preparation. If the substrate is uneven or the levels are wrong, flexibility won’t save the installation.
Pre-formed flange systems can work well when one party controls the process from substrate preparation through to membrane and tile set-out. They usually become problematic when trades mix products without considering compatibility or alter the sequence on the run.
What often goes wrong with each type
The product itself is rarely the whole story. Failure usually comes from one of these trade errors:
- Wrong product for the location. A profile intended as a trim gets used where a true barrier is required.
- Poor bond to substrate. The barrier may move, lift, or sit out of line.
- No proper membrane connection. The waterstop exists physically but isn’t part of a sealed system.
- Tile set-out ignores the vertical leg. Finished levels leave the barrier ineffective or concealed in the wrong position.
If you want a plain-language breakdown of threshold details, this guide to what is a threshold water stop is useful background before looking at site evidence.
For dispute work, I don’t place much weight on what a contractor calls the product. I want to know what it was meant to do, whether it was suitable for that purpose, and whether the final built condition allows it to perform.
Correct Placement for Compliant Waterproofing
Location decides whether a waterstop can work at all. A perfectly good product installed in the wrong place is still defective. In bathroom inspections, placement has to be assessed against the room layout, the shower type, the falls, the finished floor levels, and the membrane detail.
The easiest way to think about waterstops in bathrooms is to follow the likely path of escaping water. Wherever water can leave the intended wet area and reach vulnerable finishes, there should be a deliberate control point.
The key installation zones
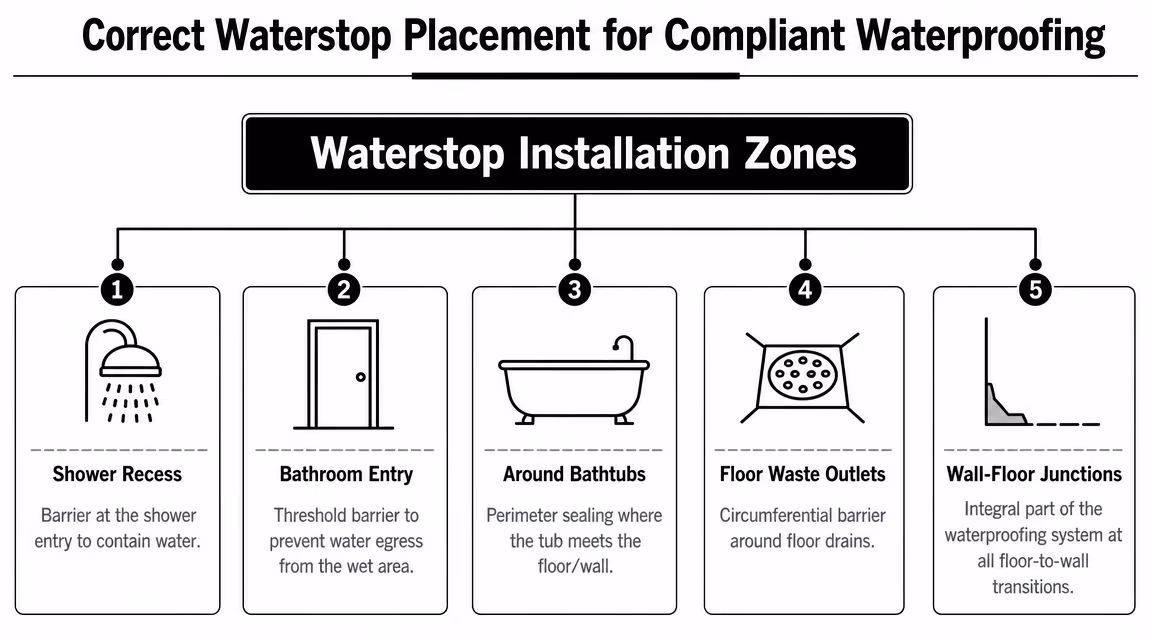
At inspection, these are the places I pay closest attention to:
- Shower opening. This is the obvious one. Water needs to be retained within the shower zone rather than allowed to track into the bathroom floor outside.
- Wet-area doorway. Where a bathroom opens to adjoining habitable finishes, a threshold barrier helps stop water egress.
- Perimeter of shower layouts. Open-plan and unenclosed designs need careful control because there is no physical screen doing the work.
- Bath edges and hobs where relevant. Any transition where water can reach beyond the intended wet area needs to be checked as part of the system.
- Critical floor and wall transitions. Not every junction uses a visible stand-alone profile, but the barrier function still has to be achieved as part of the waterproofing detail.
The logic is always the same. Water should be directed toward drainage, not toward the hallway, vanity area, bedroom wall, or skirting outside the bathroom.
Why falls and thresholds have to work together
A waterstop isn’t there to fight bad falls. It works with the falls. If the finished floor pitches water toward the opening, the threshold detail carries more load than it should. If the threshold is missing as well, escape is almost guaranteed under normal use.
For homeowners comparing layouts, it can help to compare waterproofing options in the broader context of shower design and wet-area detailing. The finish you want has to be matched by a detail that can contain water.
A short visual explanation of shower threshold practice helps make that clearer:
Placement errors that show up in reports
Some of the most common placement problems are easy to describe but expensive to fix:
- Threshold set too far back or too far forward, so the functional wet-area edge and the barrier line do not match.
- Discontinuous barrier at jambs or corners, leaving side paths for water migration.
- No barrier at the actual egress point, even though one may exist elsewhere in the assembly.
The right product in the wrong location is still non-compliant in practical terms because water follows the built condition, not the intention on the drawing.
Understanding Waterstops in Australian Standards
In legal and expert-report work, the value of a waterstop issue lies in its measurability. Standards-based defects are stronger than general complaints because they can be checked against the finished work.
Australian requirements treat waterstops in bathrooms as a code-driven detail under AS 3740:2021 and the NCC 2022. The requirement that becomes especially important in disputes is the threshold for a shower with no hob. In that situation, the vertical leg of the waterstop must finish at least 5 mm above the finished floor or tile level, as set out in this discussion of shower waterstop requirements. That same guidance explains why the 5 mm dimension matters. It is intended to stop water sheeting out of the wet area, and it is a measurable site outcome rather than a matter of opinion.
The measurements that matter
For dispute purposes, these are the most useful compliance points to understand:
- No-hob shower threshold. The vertical leg must finish at least 5 mm above the finished floor or tile level.
- Unenclosed shower extent. For a Type 2 unenclosed shower, the barrier is set 1500 mm from the shower rose connection.
- Unenclosed shower opening requirement. For unenclosed showers, the waterstop must extend a minimum horizontal distance of 1500 mm from the shower rose.
- Type distinction matters. Guidance distinguishes between Type 1 and Type 2 unenclosed showers, which affects where the waterstop is expected to be located.
These aren’t drafting niceties. They are what turns an argument into an inspection finding.
Why measurable criteria matter in NCAT work
If an owner says, “water gets out of the shower”, that’s a symptom. If inspection shows the vertical leg does not finish high enough above the completed tiled surface, that’s evidence. If the unenclosed shower barrier is missing from the required perimeter location, that’s evidence as well.
Compliance view: A waterstop defect is strongest when you can point to a built condition, measure it, photograph it, and tie it to the required detail.
Be careful with generic industry graphics
The infographic above includes broader visual prompts, but in tribunal work I rely on the measurable requirements tied to the applicable standard and the specific bathroom layout. Generic statements such as “fully embedded” or “100% sealed” may describe good practice, but they do not replace the need to assess the precise threshold, location, sequencing, and integration that the built bathroom required.
The most important lesson for owners and solicitors is this. A leak complaint becomes much more useful when the report identifies a standard-based departure at a visible opening, doorway, or shower perimeter. That is the difference between alleging poor workmanship and demonstrating non-compliance.
Common Failures and How to Document Defects for NCAT
The biggest mistake people make is assuming that the mere presence of a waterstop ends the inquiry. It doesn’t. A profile may be visible at the threshold and still fail to perform because the junction wasn’t waterproofed properly, the products were incompatible, or the finished tile level left the vertical leg too low to function.
That distinction is well recognised in practice. As explained in this industry discussion about waterstop failures and flood testing, the presence of a waterstop is not proof of compliance. Failures still occur through poor junction waterproofing, incompatible products, or incorrect finished-floor levels, and in NSW dispute work the defect may remain latent until tiling is complete or flood testing exposes it.
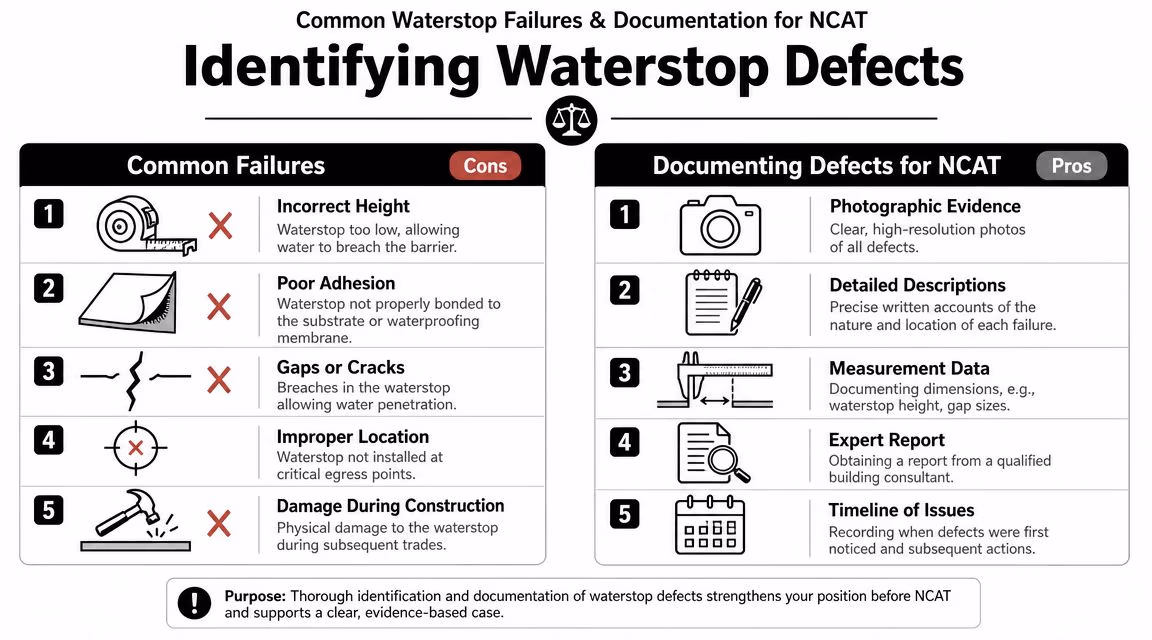
Failures I see repeatedly
Some defects are obvious once exposed. Others only become clear when the bathroom is tested or opened up.
- Incorrect finished height. The barrier sits too low relative to the finished tiled surface, so water sheets over it.
- Poor junction detailing. The threshold profile may be present, but the membrane connection at corners or returns is weak or discontinuous.
- Wrong sequencing. The waterstop was installed after the membrane stage, which means the membrane was never properly sealed to it.
- Product mismatch. The installer combined products that don’t bond reliably at the junction.
- Post-install damage. A later trade cuts, loosens, or bridges the detail during screeding, tiling, or fit-off.
What to photograph and record
If the matter may end up in NCAT, document the bathroom before anyone starts patching it. Use a methodical approach.
Take overall location shots
Start with wide photos showing the bathroom layout, the shower opening, the doorway, and any adjacent damage. That provides context.Take close-up defect shots
Photograph the threshold, side returns, corners, and any visible cracking, gaps, or movement. Good lighting matters more than fancy equipment.Include scale in the photo
Use a ruler, tape, or other measuring reference where relevant. If a height or offset is in issue, the image should help prove it.Record the exact position
Write down where the defect is. “Shower opening at bathroom entry side” is better than “near shower”.Link the defect to the consequence
Note what damage is visible outside the wet area. Staining, swollen trims, deteriorated skirtings, and moisture-affected adjacent finishes are all relevant observations.
What makes documentation useful in a tribunal setting
Good evidence is organised, specific, and restrained. It doesn’t overstate the case. It records what is visible and measurable.
A practical file should include:
- A dated photo set with captions
- A defect list identifying each location separately
- Measurements where dimensions are relevant
- A chronology of when leakage or damage was first noticed
- Builder correspondence if notice has already been given
If the dispute is already active, a formal waterproofing defect report can help convert those observations into an expert assessment tied to the standard, the site evidence, and the scope of rectification.
In NCAT matters, the strongest bathroom evidence usually comes from clear site photographs, restrained language, and measurements that can be checked by someone else.
Remediation Options and When to Engage an Expert
Rectification depends on what has failed. If the issue is limited to a localised junction and the surrounding waterproofing can be shown to remain sound, a targeted repair may be possible. In more serious cases, the threshold tiles need to come up, the defective detail has to be removed, a compliant barrier installed, and the junction re-waterproofed before retiling.
Where there is broader membrane failure, failed falls, or uncertainty about the hidden condition, a local patch often becomes false economy. A bathroom can’t be repaired properly by preserving defective substrate work just to save the tile finish. That’s especially true where damage has already spread beyond the shower opening.
When owners should stop guessing
There’s a point where DIY investigation becomes risky. If you’re in dispute with a builder, if the bathroom is relatively new, if rectification scope is contested, or if NCAT is likely, don’t let multiple trades start offering casual opinions and ad hoc fixes. Every unrecorded intervention makes the evidence weaker.
In those cases, an independent consultant should inspect first, identify the actual mechanism of failure, and document whether the defect concerns location, height, sequencing, membrane integration, or a combination of those issues.
Practical triggers for expert involvement
These are the situations where expert input is usually warranted:
- The builder disputes that a defect exists
- The work has already been tiled and the issue may be latent
- Water damage has reached adjoining rooms or finishes
- You need a report suitable for lawyers, insurers, or NCAT
- The proposed repair sounds superficial compared with the symptoms
Homeowners should also move quickly where water is already escaping the bathroom and affecting surrounding building fabric. General guidance like Anytime Drain Solutions’ expert advice is useful in one respect. Delayed action usually gives moisture more time to affect adjacent materials, and that can complicate both repair scope and evidence.
For parties needing formal documentation, Awesim Building Consultants can carry out site investigations and prepare Expert Witness Reports and Scott Schedules for building disputes involving bathroom waterproofing and threshold defects.
If you need independent advice on waterstops in bathrooms, defect documentation, or an NCAT-ready inspection, contact Awesim Building Consultants. Email admin@awesim.com.au or call 1800 293 746 to discuss a site investigation, Expert Witness Report, or Scott Schedule.


