
Cavity Wall Tie Corrosion: Causes, Risks and Remediation
You notice a clean horizontal crack running through the mortar joints of the brickwork. A few weeks later, the outer wall appears to bulge slightly, or the crack seems to return after it has been repointed. It's tempting to treat the problem as ordinary settlement or a cosmetic maintenance issue, but cavity wall tie corrosion can affect the hidden connection that keeps the external brick leaf restrained.
That distinction matters in New South Wales. The issue may be age-related deterioration, or it may indicate that the original wall ties were never suitable for the property's exposure zone. Those are different problems with different implications for repair, compliance, insurance and a building dispute.
Why Cavity Wall Tie Corrosion Demands Immediate Attention
A homeowner may see the symptom long before the cause is understood. Horizontal cracking repeats through mortar joints, joints open, or a section of brickwork appears to have moved outward. From ground level the wall may still look stable, so repointing is often arranged before anyone assesses the restraint system.
Repointing can conceal the crack for a time, but it does not restore a corroded tie. These concealed metal connectors join the outer brick leaf to the inner structural leaf, whether that backing is masonry or a framed wall. As corrosion reduces their section and capacity, the outer leaf can progressively lose restraint.
Two separate questions need answering in NSW. Is this age-related deterioration of ties that were suitable when installed, or did the original ties fail to meet the property's exposure requirements? The first is a maintenance and repair issue. The second may support a building-defect claim, depending on the evidence.
Australian technical guidance identifies horizontal cracking, outer leaf bowing and cracked mortar joints as recognised signs of deteriorating ties, particularly in older cavity brick buildings using galvanised ties during the 1960s to 1980s. Australian technical guidance on cavity wall tie corrosion explains why that construction period warrants closer assessment.
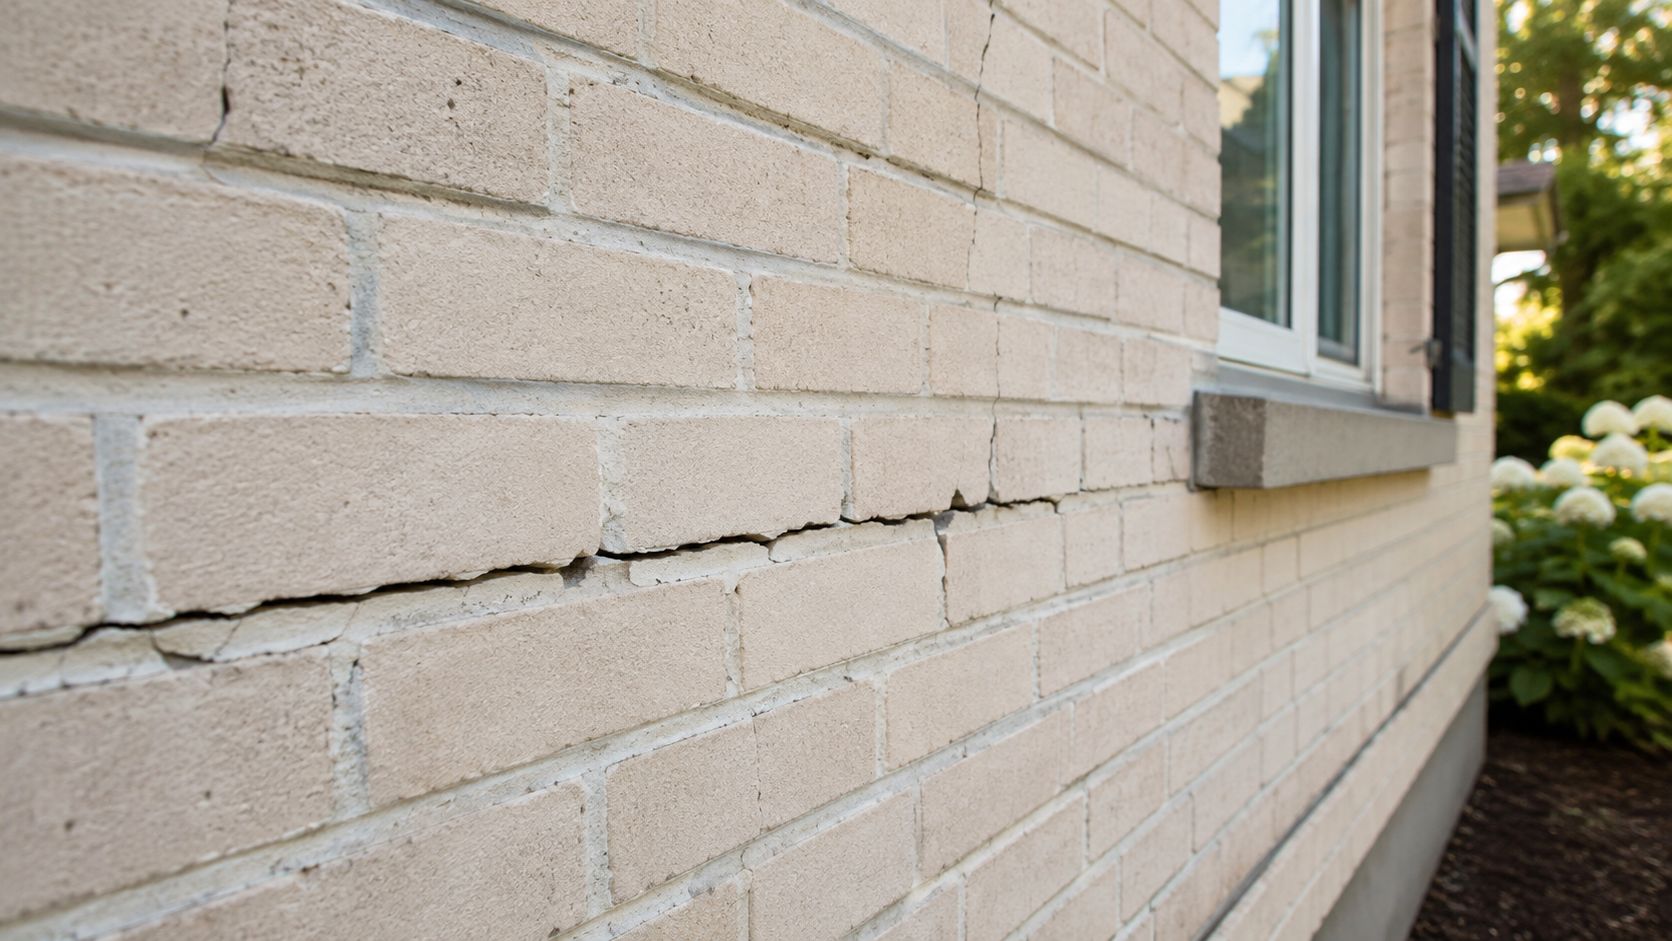
Practical rule: Do not fill, paint or repoint a repeating horizontal crack until wall-tie failure has been considered.
The risk is structural, not merely cosmetic. Corroding steel expands within the masonry and can force the brick leaves apart. Australian wall-tie guidance describes the potential for substantial expansion and masonry damage, so the condition of the tie, its corrosion protection and the wall's exposure should be established before repair decisions are made. Australian wall-tie restraint guidance
If the defect forms part of a broader property loss, obtain records, photographs and an independent assessment before deciding whether to find structural damage claim assistance.
How Wall Ties Work and Why Corrosion Attacks Them
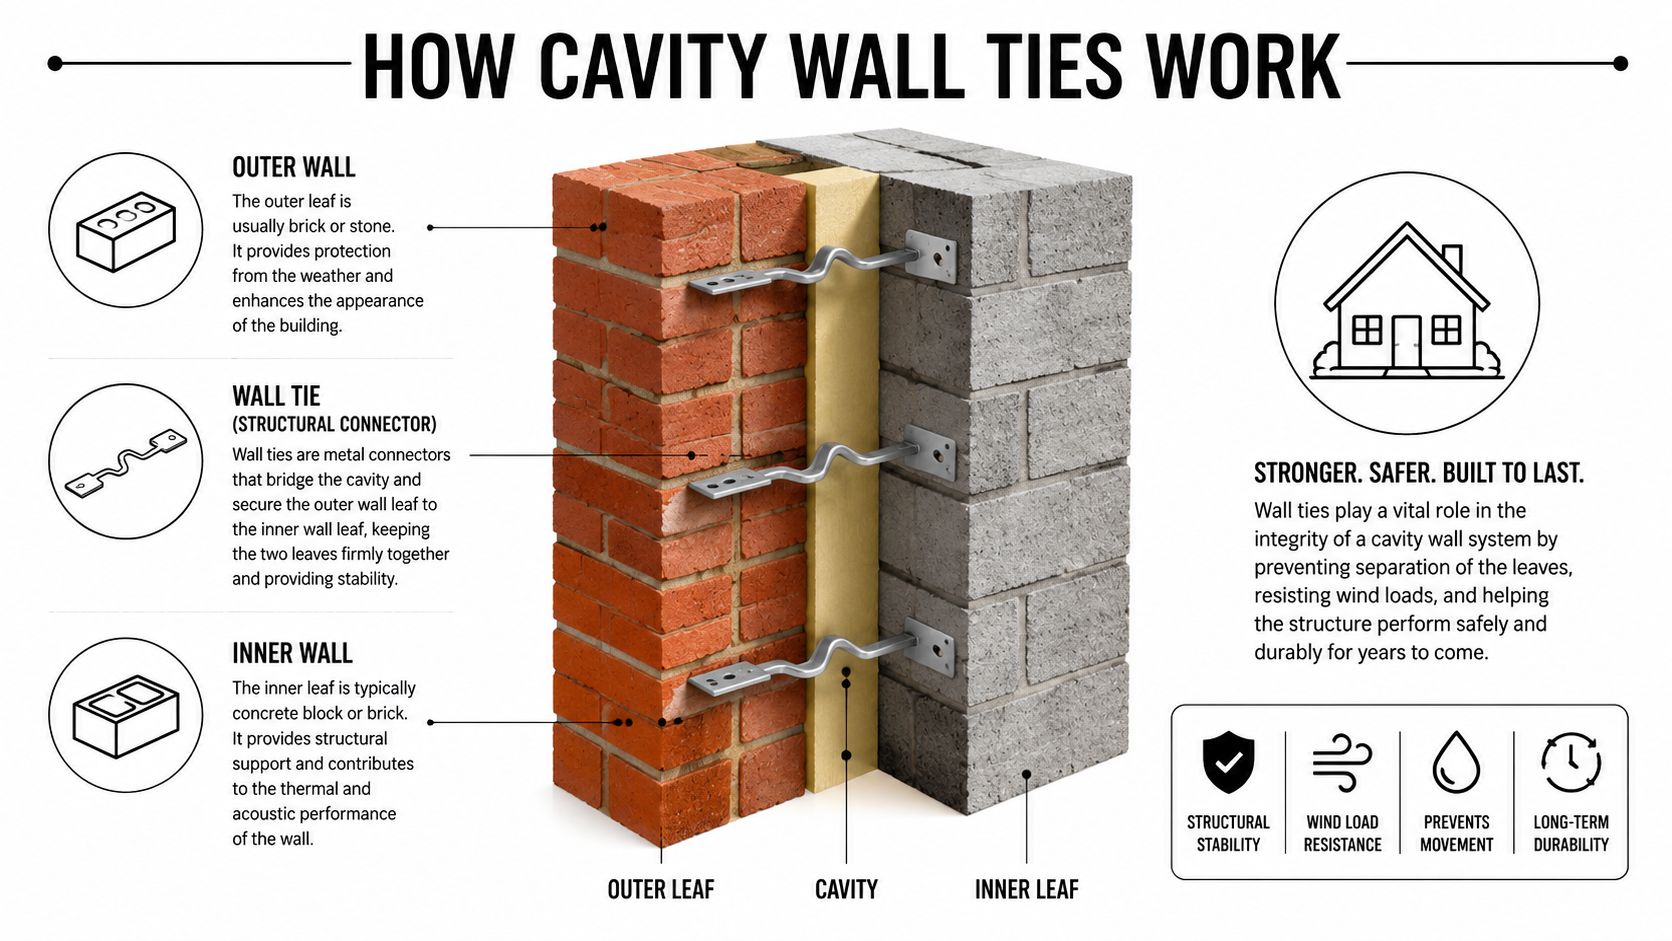
A cavity wall has three working parts. The outer leaf provides the external masonry face, the cavity helps manage moisture, and the inner leaf provides the main structural backing. Wall ties bridge the cavity and connect the two leaves so the outer brickwork isn't left to resist wind loads independently.
The tie is embedded into mortar joints on both sides. That fixing arrangement is important because the most aggressive corrosion commonly occurs at the mortar-embedded interface, not in the open cavity. Moisture and electrolytes within mortar can create a localised corrosion cell around the embedded section.
A useful comparison is a bridge cable. The cable span may look sound, while corrosion is concentrated at the anchor where moisture, contaminants and stress meet. A cavity wall tie can behave in much the same way. Viewing the exposed length through a small inspection hole may show only part of the problem.
The mortar interface is the critical zone
Research into cavity-brick wall ties identifies the mortar interface as the primary loss region. One Australian review notes that when remaining tie thickness falls below approximately 0.3 mm, the failure mode can shift from loss of fixity to tie fracture, increasing the likelihood of cracking and leaf separation. Research on corrosion at wall-tie interfaces supports why a cavity-only inspection may underestimate the defect.
A borescope remains useful. It can identify tie type, visible rust, cavity debris, insulation and obvious displacement. It can't automatically prove that the tie remains structurally effective at the point where it is buried in mortar.
For a practical explanation of related brick veneer construction issues, see this guide to brick veneer wall construction defects and site checks.
Warning Signs That Indicate Tie Failure
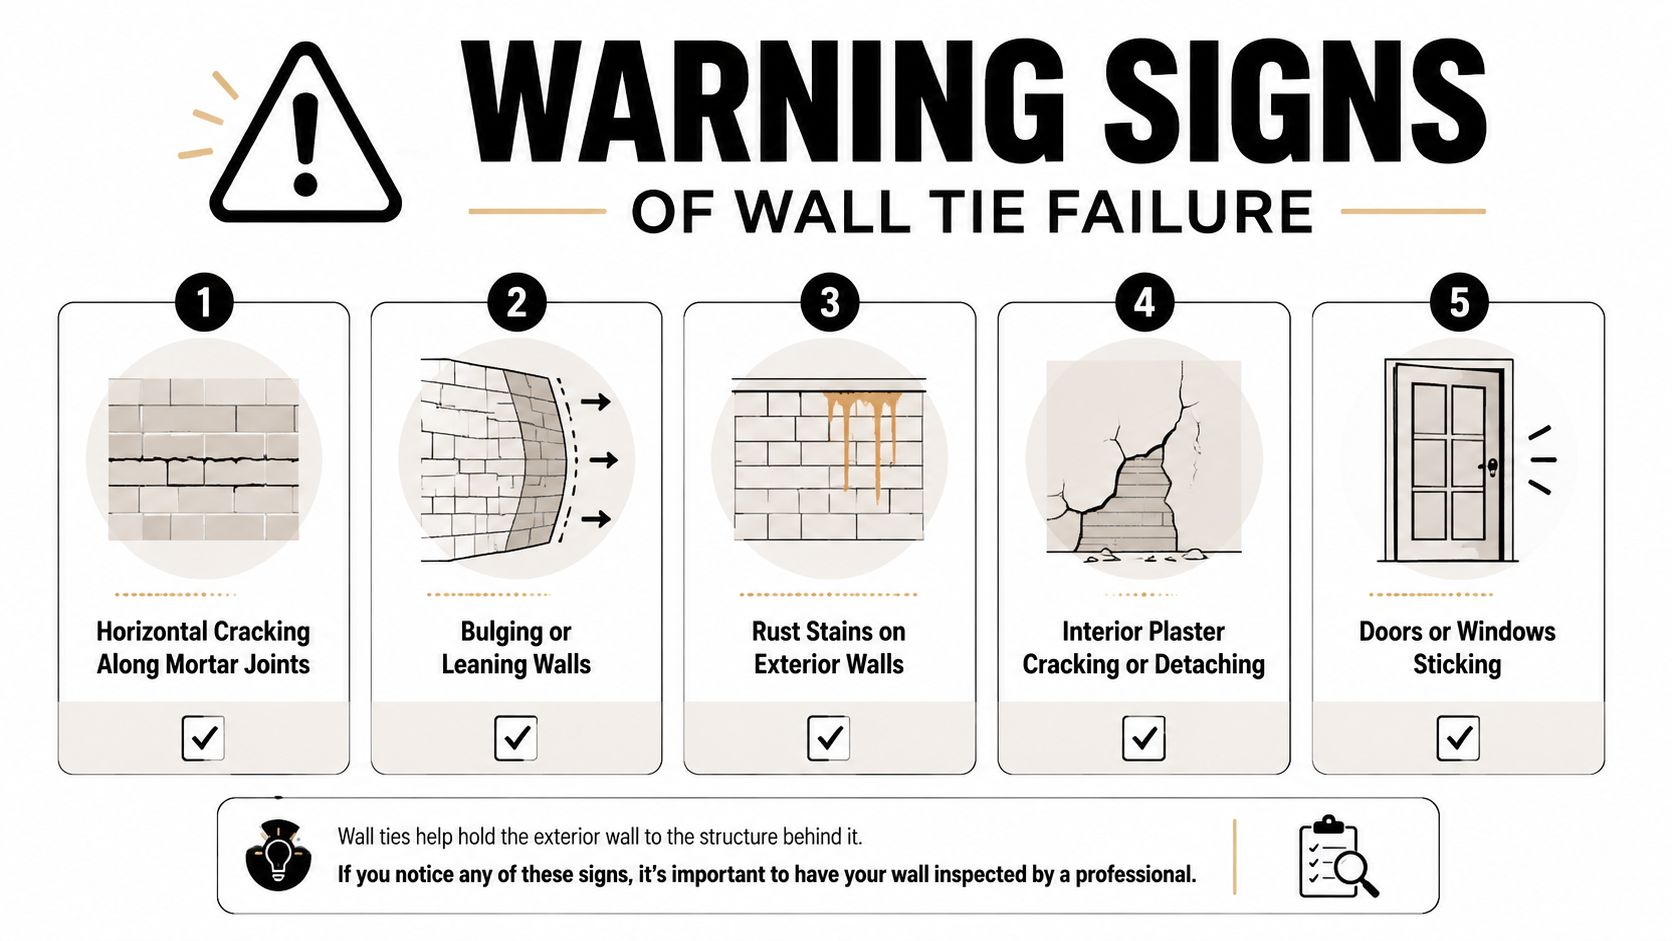
A wall can look sound from the footpath while corrosion has already reduced the ties hidden in the cavity. The strongest visual clue is pattern. Settlement usually creates stepped or diagonal cracking, often near openings or changes in foundation support. Tie deterioration more often creates horizontal cracking that repeats across the elevation and follows the level of embedded ties.
Australian guidance identifies regularly spaced horizontal cracks, often about 450 to 600 millimetres apart, as a recognised warning sign. The spacing may correspond with tie positions in cavity-brick construction. Technical guidance on cavity wall tie deterioration
What to look for outside
- Horizontal mortar cracking: Check for cracks following bed joints rather than cutting diagonally through bricks.
- Bulging or leaning brickwork: Sight along the elevation from an oblique angle. A localised bow can be easier to detect than a fine crack.
- Rust staining: Brown or orange marks at mortar joints may indicate corrosion products within the cavity.
- Bulging mortar joints: Expanding corrosion can displace, split or loosen surrounding mortar.
- Spalled brick faces: Brick surfaces may break away where internal pressure or moisture has caused damage.
What may appear indoors
Interior plaster cracks, separation around openings, dampness and movement at finishes can accompany external masonry movement. Sticking doors or windows may indicate broader building movement, but that symptom alone does not diagnose tie corrosion.
Regular external cracking provides more useful evidence than one indoor symptom. Photograph individual cracks closely and the full elevation from a distance. Record their approximate position, direction and width. Do not remove bricks or drill into the wall before a professional has considered services, stability and preservation of evidence.
The video below gives a visual overview of warning signs and explains why they warrant investigation.
Visual symptoms indicate a potential defect only. They cannot establish how much metal remains in the ties, whether ties are missing, or whether the original system complied with the construction requirements applying when it was built. Those questions require inspection and, where appropriate, supporting records.
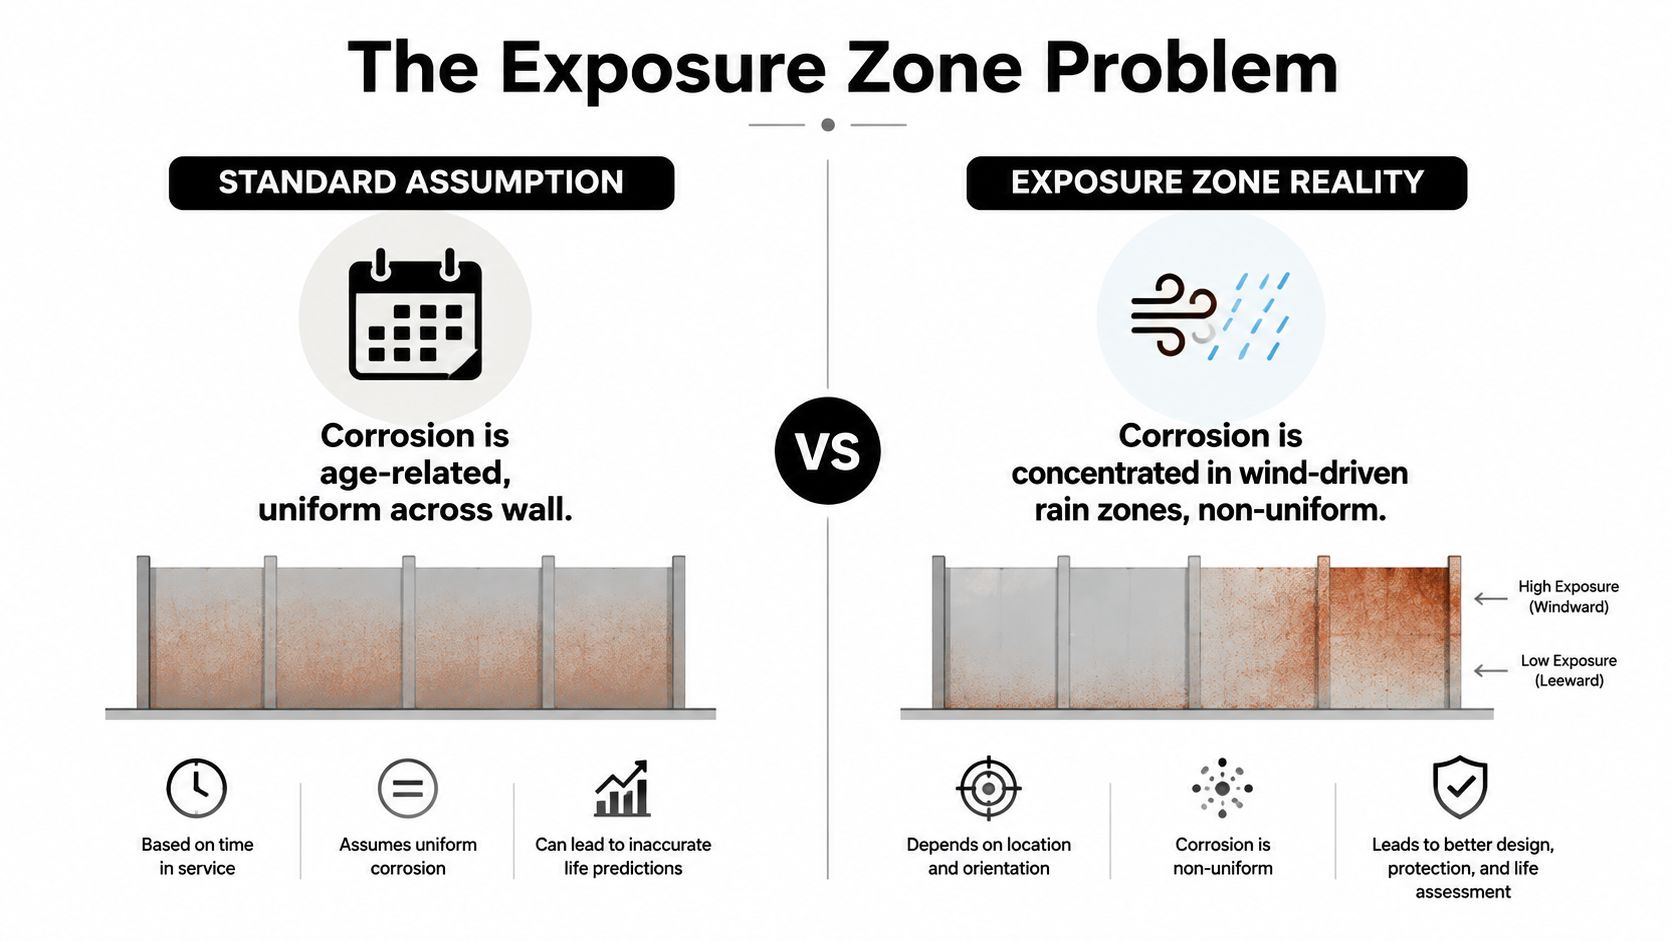
The Exposure Zone Problem Most Guides Ignore
Cavity wall tie corrosion isn't always an age problem. The original product may have been unsuitable for the location from the day it was installed.
The National Construction Code treats corrosion protection as a location-based design issue. NCC Table 3.3.5.4 requires protection to match exposure, including 316L stainless steel ties for heavy industrial areas, 304L stainless steel or heavily galvanised ties for coastal zones from 100 metres to 10 kilometres from breaking surf, and 300 g/m² galvanising on each side for all other areas. These requirements are discussed in the Australian construction research literature. NCC corrosion protection requirements for masonry veneer ties
For severe marine exposure classified as R4, Australian guidance specifies 316 or 316L stainless steel, typically within about 100 metres of a non-surf coast or 1 kilometre of a surf coast. The same guidance refers to airborne salinity at the masonry exterior reaching about 300 g/m²/day in those conditions, where galvanised mild-steel ties aren't considered durable. Australian stainless steel wall-tie guidance
Why this changes a building dispute
A coastal NSW property may have aggressive chloride exposure even if the owner has maintained the façade properly. If the original tie grade didn't match the exposure classification, the issue may involve incorrect product selection or installation, not the owner's failure to maintain the building.
Distance from breaking surf, wind-driven rain, marine air, industrial contaminants, wall orientation and site conditions all matter. A postcode is a starting point, not the complete assessment. The relevant records may include the construction date, plans, specifications, certificates, product information and photographs from the build.
The NCC also requires masonry wall ties to comply with AS/NZS 2699.1 and to be selected by wind and exposure conditions. In cavity masonry walls, light-duty ties are permitted only in N1 wind areas, while medium-duty ties are required above N1. NCC masonry components and accessories provisions sets out the relevant framework.
Related moisture pathways can complicate the diagnosis, so owners should also understand why weep holes in brick veneer walls fail.
Professional Inspection Methods and Their Limitations
A sound investigation uses the visible symptoms to decide where and how to test the hidden wall. No single inspection method answers every question.
Start with a whole-wall assessment
The investigator should inspect all accessible elevations, note crack direction and spacing, assess bowing, check openings and identify exposure conditions. The survey should also consider weep holes, damp sources, cavity insulation, mortar condition and any alterations that may have changed moisture behaviour.
A cover meter or wall scanner can help locate metal ties and map their spacing without immediately opening the wall. That information can show whether the observed cracking corresponds with a regular tie arrangement. It can also identify areas where ties appear absent or irregularly positioned.
Use cavity viewing carefully
A small drilled hole and borescope can reveal the cavity, the exposed portion of the tie and obstructions such as insulation or debris. It's a useful non-destructive or minimally intrusive method, but the camera may not show the embedded mortar interface where corrosion is most advanced.
Selected destructive investigation may therefore be necessary. Carefully removing a brick or opening a mortar joint allows direct inspection of the tie, measurement of remaining section and assessment of rust expansion. The number and location of openings should be planned so the evidence represents the wall rather than a single convenient point.
A clean-looking cavity is not proof that the embedded tie is sound.
Laboratory corrosion testing can help explain material durability and environmental exposure. For general background on how salt exposure is assessed, this salt spray corrosion testing guide is a useful technical resource, though a laboratory test doesn't replace an on-site structural assessment.
The final report should distinguish observed fact, professional interpretation and recommended rectification. A report that only states “rust was visible” may be inadequate for deciding whether the wall remains stable or whether a compliance issue exists.
Remediation Options and When Each Approach Is Appropriate
The correct repair depends on what has failed. Replacing ties without addressing distorted masonry, moisture entry or an unsuitable exposure grade can leave the underlying problem unresolved.
Stainless steel remedial ties are often appropriate where the outer leaf remains sufficiently sound and the cavity geometry allows the new ties to connect securely to the inner structural leaf. Installers drill through selected mortar joints and mechanically fix or grout new ties into position, bypassing the deteriorated original connectors. Existing ties may need to be isolated or otherwise dealt with according to the repair design.
Partial or full reconstruction becomes more appropriate where brickwork has bowed substantially, bricks are damaged, mortar has lost integrity, or the cavity is too narrow or obstructed for the specified remedial tie system. Rebuilding allows the contractor to remove unstable masonry and install new ties as the wall is reconstructed.
The replacement grade must suit the exposure zone. Using ordinary galvanised ties in a severe marine environment would repeat the specification problem rather than solve it.
Remediation Options Comparison
| Remediation Method | Best Suited For | Disruption Level | Expected Lifespan |
|---|---|---|---|
| Stainless steel remedial ties | Sound outer masonry with accessible, suitable cavity geometry | Lower, with work generally concentrated at drilled mortar-joint locations | Depends on grade, installation and exposure suitability |
| Resin-fixed or grouted remedial ties | Masonry or connection conditions requiring bonded installation | Moderate, with additional preparation and curing requirements | Depends on the system, substrate and exposure classification |
| Partial outer-leaf reconstruction | Localised bowing, damaged bricks or areas where ties can't be installed reliably | High within the affected area | Comparable to properly executed new work |
| Full outer-leaf reconstruction | Widespread instability, severe damage or fundamental construction problems | Highest, with extensive removal and rebuilding | Comparable to properly executed new work |
A repair proposal should state the tie type, grade, embedment, spacing, fixing method, making-good requirements and treatment of the original ties. The lowest quote isn't necessarily the lowest-risk option. A cheaper method that leaves distorted masonry or uses the wrong corrosion protection can create a second defect.
NCAT Disputes and Legal Implications for NSW Property Owners
For a NSW building dispute, the central question isn't whether rust exists. The stronger question is why the ties corroded, whether the original selection suited the site, what structural function has been lost and what work is reasonably required.
That analysis separates two possible pathways:
- Age-related deterioration: The ties may have been appropriate when installed but have deteriorated through long-term exposure and moisture.
- Original compliance or construction failure: The installed ties may not have matched the required corrosion or wind-duty classification, or may have been installed inadequately.
The distinction can affect responsibility, evidence and the way a claim is pleaded. A solicitor needs more than photographs of cracking. They may need construction records, exposure analysis, tie identification, opening-up evidence, causation opinions and a defensible rectification scope.
Evidence that carries weight
An Expert Witness Report should record the site conditions, visible defects, inspection methodology, relevant standards, likely cause and appropriate rectification. It should avoid overstating what a borescope can prove and should clearly identify any limitations.
A Scott Schedule can then organise each alleged defect, the responding position, the expert opinion, proposed work and associated quantum. That format helps the parties and tribunal compare issues without losing the technical detail.
The applicable statutory warranty and limitation issues under the Home Building Act require legal advice, especially because tie corrosion may remain concealed for a long period before symptoms become obvious. A building consultant can address technical causation and compliance, but shouldn't give legal advice about whether a claim is in time or how it should be filed.
For matters requiring structured technical evidence, this information on an NCAT building Expert Witness Report explains the role such reporting can play. Engage the consultant before extensive repairs where possible. Once the wall has been opened, repointed or rebuilt, important evidence may be lost.
Your Next Steps for Assessment and Action
Start by documenting the condition. Photograph each elevation, record crack locations and spacing, note any bulging or rust staining, and keep records of when the symptoms appeared. Gather building plans, approvals, contracts, inspection records and any previous repair invoices.
Then arrange an independent site investigation. A proper assessment should consider the whole elevation, exposure zone, tie locations, mortar interface, cavity condition and the relationship between visible symptoms and hidden performance. Ask for the report to separate observations from opinions and to identify any further opening-up required.
Don't authorise broad repointing or reconstruction before evidence has been recorded unless immediate safety work is necessary. The resulting report may support discussions with a builder, an insurer, a solicitor or NCAT. Where the matter becomes contentious, an Expert Witness Report and a structured Scott Schedule can help organise the technical issues.
Awesim Building Consultants have 35+ years in Building & Construction, including over 15+ years providing litigation support to homeowners, builders and lawyers. The practice provides site investigations, Building & Construction Expert Witness Reports and Scott Schedules for NSW property disputes.
Awesim Building Consultants can investigate suspected cavity wall tie corrosion, assess whether the issue is deterioration or an original exposure-zone defect, and prepare evidence suitable for negotiations or proceedings. Visit Awesim Building Consultants, email admin@awesim.com.au, or call 1800 293 746 to discuss the property and the next appropriate step.

Related Posts

Building Handover Inspection: What to Check Before You Sign
A building handover inspection, also called a practical completion inspection (PCI), is your last chance to identify defects before you
Read More »
Retaining Wall Defects: Inspection, Evidence, and NSW Claims
Retaining wall defects range from visible cracking and leaning to hidden drainage failures that build dangerous hydrostatic pressure. In NSW,
Read More »
Building Maintenance Schedule: What Owners Must Document
A building maintenance schedule must document every asset, its required service frequency, the person responsible, and a timestamped record from
Read More »